Category Archives: Shop Tool

A Great Tool for the Shop

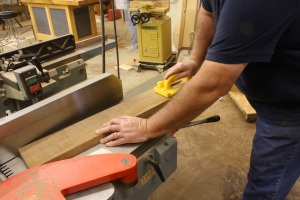
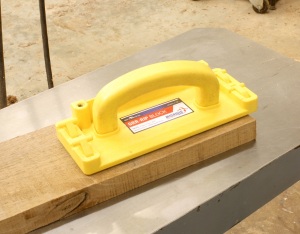
IMG_1984I don’t often write about tools I use in my shop – you see them in the background of photos taken for my posts. I have only a couple tools or machines that have immediately changed the way I woodwork. While this tool is not one of those two, it is one of only a handful that I feel should be given extra consideration. The tool, as you can see in the opening photo, is the GRR-RIP Block. (It’s from MicroJig, the same folks that make the GRR-RIPPER 3D Pushblock, which is another tool I turn to when working with small pieces.)

Since this newly designed push block came into the shop, it’s been at my jointer. I use it almost every time I surface material. The reason I use it is that it does the job easily. No matter how I pick up the GRR-Rip Block, it’s ready to use (unlike shop-made push blocks that are good only in one direction). IMG_1983The hooks (the company says Gravity Heel technology) are great. The two hooks on the end that ride the board easily pivot up into the tool, flat and out of the way. The two hooks on the opposite end, drop to catch the board’s end – it doesn’t matter which end of the tool is which. The handle has a slight bend to one side, which should be held out or away from the fence. But because I ride the work piece at an angle to the blades whenever I can (see the photo at right), I don’t worry about having the push block oriented every time.

I also like the GRR-RIP Block’s non-slip bottom surface. It grabs the hell out of rough stock and is just as good on smooth surfaces, if you keep the bottom clean.

If you’re looking for a push block, I’d suggest you look at the GRR-RIP Block. (I have no connection with the company other than I think its tools are innovative and extremely useful.)

Build Something Great!

Glen

2 Comments

Filed under Shop Tool

Best Tool for the Job

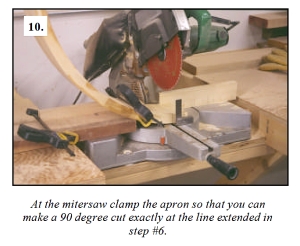
Something that I preach is that we woodworkers should use the best tool for the job. It that’s a table saw, jointer or big-honkin router, so be it. It the best tool is a handplane, egg-beater drill or sharp chisel, go for it. Mitersaw_cutTo be wholly dedicated to one woodworking discipline while ruling out others is nuts.

The story I like to tell is a tale on myself. When I built the Baltimore Card Table article for Popular Woodworking Magazine, I was more dedicated to power tools even though I used hand tools. In one of the early steps of the build, I needed to trim the ends of the brick-laid apron. I spent 20 minutes or more setting up the cut at my miter saw. Of course, the cut was square and right. (See the image from the article above.)

Years later, after hand tools began to play a bigger role in my day-to-day woodworking, I taught how to build that table at a woodworking school. When the time came to trim the apron, I grabbed my pencil and square, laid in the lines then made the cut using a hand saw. Of course, the cut was square and right. The difference was that I did not spend 20 minutes setting up the cut.

What’s important is to choose and use the best tool for the job.

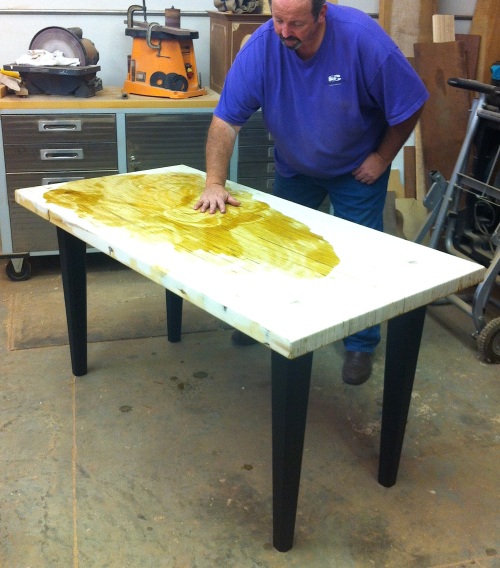
In the photo below, I guess the tool would be classified as a hand tool. I  know, however, that it is the best tool for the job. Why? No only does this tool make spreading the oil/varnish mix quick to accomplish and easier to direct finish were it’s needed, the process also warms the oil ever so slightly to better allow mixture to soak into the surface.

OV_LVL_1

Build Something Great!

Glen

8 Comments

Filed under Finish Techniques, Methods of Work, Shop Tips, Shop Tool

Screw Gains

“Their usual solution was a pair of large screws driven forward through the side rail into the front leg to supplement the hidden mortise-and-tenon joint. Each screw fits into a drilled and carved out ‘pocket’ or ‘screw gain’.”

IMG_1248Immediately as I mention pocket screws, many woodworkers’ eyes roll back into the heads as if this method of joinery is totally unacceptable. Of course, there are places where the use of pocket screws is not the best choice. There are also places in woodworking where the joint is the perfect solution. It’s up to us to know the difference and where to draw the line.

But the more you discover about pocket screws, the more fuzzy the line becomes. I’ve been in million-dollar homes, standing in kitchens that easily cost six figures, and the face frames on the cabinets were pocket screwed. Perfectly acceptable? You betcha. But that’s not furniture, right? No it’s not, but the quote above is about furniture. It’s about great furniture. Museum-quality stuff. The quote is taken from the book by Robert D. Mussey Jr. titled, “The Furniture Masterworks of John & Thomas Seymour.” The Father and son team used pocket screws. This method of joinery is not a new concept conjured up by the Kreg company, but it has elevated pocket screws to a whole new level.

The reason I write about pocket screws this morning is that I have a decision to make on the lowboy I’m building based on the piece found at the Connecticut Historical Society.

IMG_0636The lowboy has no front rail at the top of the case – the drawers kick right up against the underside of the top. There is no room for wooden clips, and I hate “figure eight” fasteners. Therefore, to attach the top I need to be creative. Or not. The top on the original was nailed or pegged to the case. I’ve seen a number of antiques that have tops nailed in place, so it’s not out of the ordinary to do so. The problem I have is that at one of the pegs – it looks like a round dowel – the top has cracked. I’m not looking to repeat that problem, but I do need a secure top.

In one of the photos I have of the original, you can see a metal angle used to gain a hold. I don’t think that is how the piece was built, but a later addition. Not what I’m after. As a result, I’m turning to pocket screws. And while I have respect for the Kreg joinery setup, I’m looking for something more traditional.

Yesterday I scanned the above-mentioned book to find ideas. I had it in my head that most pocket screws holes in antique furniture were basically v-shaped cuts, then I re-discovered the Seymour pockets. Their pockets were rounded, tapered and neatly shaped. I had something to work toward.

IMG_1252My first attempt was using a carving gouge. I used a 9/20 fish-tail gouge to carve out a pocket (see the opening photo). It looked good, but was work heavy. As I studied the shape and design, I remembered a simple jig that I had built years and years back for use with my drill press, so I dug it out, dusted it off and made it work with a newer press. (On my older DP, the jig slipped over the table, but now I had to clamp the unit in place.)

The jig is built with its fence tilted back at a 22.5-degree angle. To align the workpiece, I position it at the intersection of the jig’s fence and base as it stands on an edge. The DP head and jig are arranged until the workpiece stands under the 1″-diameter drill bit so the back edge of the bit is even with the back face of the workpiece. Clamp everything secure. I then lay the piece back tight to the fence and add a couple of spring clamps as needed. To cut the rounded, tapered hole, drill as you normally do. (Play with the bit diameter and thickness of your workpiece to find the best results.)

Below is a test piece I made using all three methods. Each of the different pockets are aligned with the tools used to make those pockets. Which am I going to use? Easy. If you read the quote above, it states that the “screw gains” (fancy-speak for pocket holes) were drilled and carved. I plan to drill the bulk of the waste using the jig and drill press, then clean the gains with my carving gouge.

IMG_1251

Which method would you use?

Build Something Great!

Glen
11 Comments

Filed under Jigs, Joinery, Shop Tool

Videos: From Woodworking in America 2012

From October 12 – 14, 2012 I taught three different sessions at Woodworking in America – West Coast in Pasadena, California. Two of the same sessions were taught at Woodworking in America – Midwest some three weeks later from November 2 – 4. During my sessions, I played short video clips that emphasized various points I thought important. After the conferences, I received many emails asking that I post these video clips on my blog.

If you attended one of my sessions during the conference, these videos make perfect sense. If, however, you did not attend my sessions, or even one of the conferences (Shame on you!), some of these short clips might not be all that they could be. But I think you could still garner a nugget of useful information. If you have comments or questions about the techniques covered in these clips, as always, add a comment at the bottom of the page. I will respond ASAP.

Build Something Great!

Glen

Doors: Types, Tips & Techniques

The Mighty Dovetail

Finishes That Pop

2 Comments

Filed under Finish Techniques, Jigs, Joinery, Power Tools, Routers, Shop Tool, Video

Router Surprise

I own a few routers. Most have cords, but I do have a router plane, too. Over time, I have come to use trim routers whenever possible. This past week while I was working on a bunch of mallet inserts, I made a discovery.

The photo above is of a small jig I created to rout a handle area into half of the assembled insert. A small block (each milled to the exact thickness, length and width) is slide into the jig then a pattern bit, installed in one of my trim routers, clears away the balance of the waste – this is step three of many steps to complete the inserts.

As each pair of routed pieces come out of the jig, I use a fractional dial caliper to measure the opening. In the past when I would make these pieces, I had measurements all over the place. I had to retract the bit depth every so often to keep the measurements within a usable guideline. It wasn’t clear what was going on. The router bit was not slipping – I have a phobia about this, so I make sure to install the bit and tighten the collet correctly. The adjustment was not a problem, but I had to keep an eye on things.

This week, as I checked each pair coming out of the jig, there was no adjustments made. From start to finish, pieces came out right. Of course, this caused me to wonder. Then it hit me. The only difference between this time and the other times when I made sporadic adjustments was the trim router used. Bingo, that must be the problem.

As shown in the opening photo, this time I use a DeWalt DWP611, which has become one of my favorite small routers. Previous times I used my Ridgid R2401. It seems my Ridgid trim router was slipping as I used it. Not the bit out of the collet as you may expect, but the motor was sliding down into the adjustable base.

I have to admit that I have used the dog out of my Ridgid router, so I don’t want to give the wrong impression. Until the DeWalt came along it’s the router I used for everything except pattern routing with a 3/4″-diameter bit. I use it so much that the bearings in my Ridgid are wearing out and the added vibration may be the cause of the unwanted slippage.

There is a fix for my problem and this is why I am bringing this to your attention. Under the clamp lock there is a nut that tightens to increase the hold. I have adjusted that nut and should no longer see any creeping of the motor. It’s important to check your small power tools on occasion just as you check your woodworking machines.

I am not going to toss my Ridgid.  No, I plan to use this router for regular routing of moldings and the like instead of operations that have critical measurements required. In fact, at $89 from Home Depot, I may purchase another to have in reserve.

Build Something Great!
Glen

Leave a comment

Filed under Jigs, Power Tools, Routers, Shop Tool

Thank You Mr. Klausz

Woodworking in America – Midwest was in its opening day when a fine-looking gentleman woodworker stops by The Acanthus Workshops booth – of which I had commandeered a small portion (Thanks, Chuck Bender) – and picks up one of my brass-head mallets. Immediately Mr. Frank Klausz looks at me and says he is taking a mallet to use during his classes. My reply, “Have fun.”

The idea that Frank used a mallet is great. The fact that he, as he handed the mallet back yesterday after his classes, told me it was a “Very nice mallet”, was awesome. The fact that I am now sold out of the first run my mallets is sad. But fear not. I have a second run in the works and should have them in a couple weeks.

If you are looking to add a great mallet to your woodworking tools, this is the mallet and this is the time. Beginning on Tuesday – election day, so please get out and vote – I will adjust mallet pricing to reflect the deal that many woodworkers took advantage of at one of the two Woodworking in America shows. For the balance of November, you can pick up a mallet (handle and insert included) for $160. That’s a savings of $25. And your mallet will be delivered during the first week of December, if not earlier. What a great gift to give or receive. Click here to see products in my online store, including the brass-head mallets.

By the way, if you placed an order for a mallet in the last couple weeks, you will also get the price reduction.

Build Something Great!

Glen

Leave a comment

Filed under Hand Tools, Shop Tool

Portable Spray Booth & Combination Square Video

I’ve had a couple questions about my spray booth when it appeared in a couple blog posts a while back. Before I tell you about my booth, let me tell you how I sprayed in the past.

For a short time – about 11 months – I had an actual spray booth. Before that I confiscated a room, installed an overhead fan that was ducted nearly ten feet to an outside wall vent and called that my spray room. (The exhaust fan wasn’t much help.) And when I began woodworking in my two-car garage, I used a 20″ box fan – it wasn’t explosion proof, either – set in a window. Also, none of these so-called booths had an explosion proof light. No, I’m not flirting with danger, I just do not think all the safety crap is necessary.

Today I have 1500 square feet to work in and my booth is a setup toward the front of my shop. (You can see it in the opening photo.) Still no explosion proof light, and no direct exhaust fan. What you do see is an old aluminum show booth to which I have packed the curtains away and hung inexpensive tarps to keep over-spray to a minimum.

You can see light streaming in from the right-hand side of the booth. That is a larger overhead door that I can open or closed depending on the temperature and weather condition. I also have a 48″ drum fan to clear the shop of unwanted fumes – I’m in an industrial-type setting.

If you’re interested in a booth like mine (who wouldn’t be) you can pick up the entire boot for around $217. You would need four 8′-0″ uprights ($15 each), four base plates at $64 and three adjustable drape supports that would run you $26 per support. The supports allow you to setup your booth between 6 feet and 10 feet wide. The same sizes are possible in depth. Three 8 x 10 tarps are maybe $15. Oh! I need to add in a set of shower curtain rings to hang the tarps. That pushes up the price a bit. Hey, it beats a cardboard box.

At the beginning of August, I wrote about a #21 Combination Square. Read the blog here. In the blog, I included that I had purchased one of these squares and would share video sometime in the future. This is the future and below is the video. Enjoy.
Build Something Great!

Glen

2 Comments

Filed under Design, Hand Tools, Questions, Shop Tips, Shop Tool

Know Your Combination Square

Photo from the BCTW site

If you read this blog weekly, you know that I am not a hand-tool aficionado,  but I do enjoy, work with and appreciate quality tools. One of my favorite hand tools is my Bridge City Tool Works CS-6 combination square. (It’s a tool I have to keep close tabs on huh, Dave.)

While teaching a class at the Connecticut Valley School of Woodworking (CVSW) last month, one of the students brought in a combination square with which I was not familiar. (Surprised?) As you can see in the photo below, what caught my attention was the slotted blade – what I considered as normal for these tools is a grooved blade. As I played with the square, I realized that the blade would not slide out of the handle, but would pivot.

I disassembled the square to take a look at the mechanism used to hold the blade. The lock pin on this square is different from new combination squares in that it has a hook at its end instead of a nub (located about mid-shaft) that fits into a groove. The hook feeds through the round cutout at one end of the blade slot – which is also where the blade is set to pivot. As you tighten the nut, the hook slips into the cast body to hold the blade from falling free. Just as with today’s combination squares, a tight nut secures the blade.

I went to the Internet in search of information. I found a Stanley catalog from 1953 that showed a square similar to the one the student had at CVSW. The information lead me to believe this was a Stanley #21 combination square. (A #22 square has the grooved blade.) As I looked at the catalog page I noticed a slight variation in body design from the cataloged tool and the one I saw at CVSW. In the photo below, the square on the left is an antique #21 found at Jim Bode Tools and is now part of my tool inventory. The one on the right is a new square found at stanleytools.com.

To me the body of the square from class looks exactly like the body of the new square. I doubt the school square is a Frankenstein tool with a new body assembled to an older blade and lock pin, so I am left to assume the slotted blade square from class is a newer version of a #21 combination square. This is where I turn to you. If you have additional information on a Stanley #21 combination square, please use the comment section below to add to my knowledge.

Build Something Great!

Glen

In my search, I also found a Stanley #21 combination square that has a 9″ blade. Below is a photo of this tool from Jon Zimmers Antique Tools.

3 Comments

Filed under Hand Tools, Shop Tool

Different Woods

Because I posted the breadboards end router technique video Wednesday, I thought I would be self-serving with this post and show the first group of custom order mallet handles to ship out.

Arranged on my bench, I was in awe of the wood types selected. As a group, woodworkers are as individual as people are as a whole. The only woods selected by more than one customer was cocobolo – I too, like this exotic – and Honduran Rosewood.

Included in the group from left to right are Tiger Maple (not an exotic, but he wanted his handle without my company name. Still trying to figure that out!), Blackwood, Honduran Rosewood, Black Palm, Cocobolo, Zebrawood, a second Cocobolo, and a second Rosewood (another without the company name).

Below is a look at the actual mallets. By the way, WoodNet folks please take notice. I have dropped the dot com from the handle engravings. After reading your thoughts, I agree that the company name is enough. The best person to listen to in business is your customer.

Happy Easter, and Build Something Great!
Glen

6 Comments

Filed under New Products, Shop Tool