Category Archives: Back to Basics

Always Something to Learn

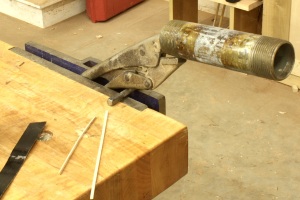
IMG_1944In woodworking, one of the most satisfying things is that you never know it all. Everyday there is something knew to learn. That’s one of the things that keeps me looking and listening and trying new ideas. In the left-hand photo, you see how I’ve set up to bend stringing since I first began working with the material. I grabbed a length of pipe in Vise-grips, clamped it into my bench vise, heated the pipe and bent the stringing over the pipe using a metal-strap backer. If you look close, you see a nail set slipped between the grips and vise. I sometimes found that downward pressure as the bend was taking place could cause the setup to move in the vise, and that’s not a good thing to have happen. The nail set stopped that.

As I’ve demonstrated this technique to different woodworking groups, I’ve had occasion to see a few interesting string-bending setups, including  a massive three-pipe selection that bolted to a workbench and allowed a constant flame to keep the pipe at the correct temperature for bending – whatever that is. I’ve also been asked so many times about using a heating iron as does Steve Latta; sorry Steve, that’s way too slow.

I did, however, learn a new setup while teaching my session at Woodworking in America this past weekend (the reason there was no post on this blog last Sunday). I traveled to Winston-Salem, N.C. without my Vise-grips and nail set. When it came time to demonstrate the technique, I was at a loss. Until, that is, I grabbed the F-style clamp I tossed in the conglomerate of stuff I’d taken along. With the length of pipe secure in the clamp, I set it into the bench vise with the handle resting against the top of the vise. No amount of downward force would cause the setup to move. And as long as you remove any plastic fittings from the clamp, heat from my torch was not a worry. It worked great.
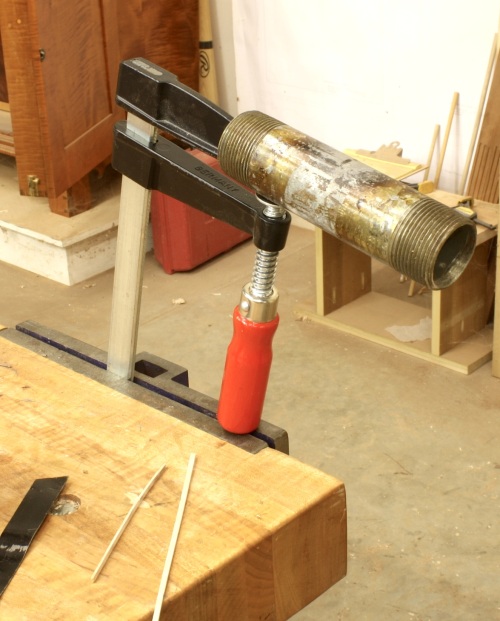
IMG_1943There’s always something new to learn in woodworking.

Build Something Great!

Glen

3 Comments

Filed under Back to Basics, Inlay, Jigs, Methods of Work, Shop Tips

Best Glass Cleaner

IMG_1878Here’s a quick tip to clean glass panes or windows. Forget Windex Glass Cleaner. Forget those local community car washes that use newspaper to clean car windows. The best way to clean glass is with – wait for it – steel wool. That’s right steel wool. There’s no need for any liquid cleaner, but you have to use the right steel wool. You should use #0000 (four aught) steel wool.

I learned this tip from a friend years back. He was in the automotive repair and body shop business and was forever cleaning windows. At first, I thought he was pulling my leg (that’s Midwestern for joshing me, kidding me or otherwise telling me stories). As soon as I got back to the shop, however, I gave it a try. The results are great. I never turned back to any other method for cleaning my glass windows. Give it a try on your home windows, too. But make sure you’re not scrubbing any UV film coverings.

Build Something Great!

Glen

1 Comment

Filed under Back to Basics, Methods of Work, Shop Tips

Four-squared Boards

2M4A2095I needed a single board for a project that I’m building in an upcoming issue of Popular Woodworking Magazine. The only surface I need to look good is the front edge which faces the front of my cabinet. With no milled lumber available other than a few natural-edge cutoffs, I laid a straightedge on two of the cutoffs to remove the natural edges, made cuts at a band saw, jointed the edges and glued the two boards together to make one. A great method to stretch lumber on a project.

As I assembled the pieces, I thought back to classes in which I’ve taught woodworkers proper milling techniques using machines. Step one is to flatten a face. In my system, step two is to use a thickness planer to create a parallel face. For some woodworkers, step two is to square one of the edges while at a jointer, but I disagree. If you square an edge, does that edge remain square as you flatten the second face, especially while flipping the board end-for-end during the milling process to keep the exposed surfaces at equal moisture content? There’s a chance that it doesn’t – if your board rides up on an elevated edge of the planer bed, or if a small chunk finds its way under one of the corners as you send the piece through the planer, you could change the squareness of that edge of the workpiece. That makes step three, for me, to then create an edge that is square to both faces. It’s at this point that I often run crossways of students in the class.

Many woodworkers feel that it’s necessary (step four) that you rip the board at the table saw. Is it? The answer is that it depends. If you’re simply joining two or more boards in a panel glue-up, it’s not important that the boards are ripped into a four-square configuration. Why waste the wood. Make your step four at the jointer. In fact, one of the best techniques for hiding seams when assembling panels is to cut a board for a better grain match, which removes the four-square measurements from your board. If however, you’re preparing a board for use in your project, then make your step four at a table saw. You need to think through operations and not simply be guided by a set of rules. We all know that rules are to be broken.

If you’re preparing your lumber using handplanes, you need to go about the work differently. You also need to answer a question for me – what the hell is wrong with you? Milling lumber is grunt work. Use a machine for the grunt work and use your handplanes for finish work. C’mon man!

Build Something Great!

Glen

3 Comments

Filed under Back to Basics, Methods of Work

Knee Surgery or Not

106If you build Queen Anne or Chippendale furniture, you most likely have made cabriole legs. If you’ve cut and finished cabriole legs, you most likely have work on knee blocks. Or have you? Over the years, I have run into three methods used to address knee blocks.There are knee blocks that fit in front of aprons, those that fit under aprons and there are cabriole legs that do not use blocks at all.

One habit I got into as I work on these curvy legs is to keep my cutoffs. The material you cut away from legs as you sculpt them from blanks perfectly matches the legs; the grain is right and the color is right. 110That’s the best material to use for your knee blocks.

In the opening photo you can see the first step in knee block fabrication. There are a few things to remember as you work on blocks. In the Massachusetts High Chest of Drawers DVD (the piece shown in the first two photos), the apron is behind the block. (You don’t, however, attach the blocks to the apron; they still attach to the legs.) As you make these leg add-ons, it’s important to match the grain. That can be difficult.

As you profile the knee blocks, each time you complete a step, the grain changes. When you make the cut to the pencil line in the photo, the grain moves. As you round the piece in the second step of the process, grain moves again. Dressing TableYou need to be able to read the grain as it appears in the finished blocks if you want to achieve the perfect appearance when you’ve completed the work. As you also see in the above photo, color matches are important – I didn’t do so good on that task.

Some blocks fit under the apron, as seen to the left in the cover project from the June 2010 issue of Popular Woodworking Magazine (#183). The importance of grain matching in this instance is the same. Even though the block fits under the apron, it still attaches to the leg and the grain should match. If the look and fit are correct, the connection appears seamless. That’s what you’re after.

This week I began building the Connecticut lowboy – and as always with me, I began with the legs. CT LowboyAnd I saved the cutoffs. As I got into the legs a bit farther, I realized that I didn’t need the extra material because these legs did not have knee blocks. What the maker did was round the material from the front of the knee to the inside edges. If you look at the legs straight on, you almost see a half circle as you view from the right side of the upper leg to the left side. It’s interesting when you first see it.

As you work the material to round the knee area, you also need to roll the material back toward the leg post. As I completed the shaping of the second leg, I realized that a #3, 20 carving gouge used inverted did a nice job rounding and rolling. (I used only my chisels sculpting the first leg.)

What struck me the hardest was that I was in the shop for about eight hours – probably worked for maybe five hours with all the talk and lunch – and two shaped legs was all that resulted. I could easily get all four legs complete a decade ago. I was reminded that my earlier shop was air-conditioned and working in the heat was most likely the cause for my lack of completion. Yeah. I’ll go with that. In my mind, though, I know it’s simply age.

Build Something Great!

Glen

Leave a comment

Filed under Back to Basics, Methods of Work

Two of My Top Ten Gripes

Woodworking is a great way to make a living. There are, however, problems with even this career. This week I’m posting two of my current top ten gripes.

Bump-cutNumber one on my list – this specific gripe stays at number one or number two throughout most of the year – is the safety police. If this is you, please know that it is not your job to constantly point out things that you consider too dangerous. The fact that I don’t have on safety glasses and ear protection as I work at my table saw or run a router is not the end of the world. These particular violations have been pointed out so often that we all know the rules. If you feel you need to wear glasses every time you step into your shop, then do so.

Number two this week are those that hear someone state a woodworking rule, but do not hear or understand the exact meaning of that stated rule. Case in point: Don’t use your table saw fence in conjunction with your miter gauge, and never glue cross grain.

This past week I posted on the Popular Woodworking Magazine (PWM) blog about bump-cut tenons. This technique has been used for years and years – someone commented that they had seen Norm Abram use this on New Yankee Workshop. The rule that should be followed is that you should not use your table saw fence in conjunction with your miter gauge IF YOU ARE MAKING A THROUGH CUT. That last portion of the sentence is the real message. If you’re not cutting through, use your fence and miter gauge as you see fit.

Another rule is that if you glue cross grain your board will split. I ran into this problem way back in another post on the PWM blog dealing with case sides in lowboys. It has also surfaced when working on the returns around slant-lid desk lids. Both can and often were glued fully.

IMG_1060Take a look at the this photo. What you see is a torn-apart bookcase side that I assembled in 1977 or 1978. (It was a bookcase for a high school sweetheart who broke up with me before I finished the top section.) These boards have been stored in a stone-walled basement of an old farmhouse, been moved from house to house in six moves and have been stored in my garage for the last 20 years. This week I went to re-purpose the wood to knock out a couple small drawers. I tried to knock off the blocks with my hammer, then tried to hook the claw of said hammer under a corner to split the pieces apart. No luck. Finally I drove a screwdriver between the two pieces and the split was made.

In the photo you can see that the regular yellow glue did not fail. What failed was the wood. While this glue-up was across only about 8″, I think it shows that it’s possible to glue in this manner and there are certain circumstances when it is OK to do so. You just need to know the rule – the exact rule – and when you can bend it. (I always glue the first 4″ to 6″ of moldings I use on my projects.)

Please don’t blindly follow what you hear or read.

Build Something Great!

Glen

11 Comments

Filed under Back to Basics, Shop Tips

The Best Legs

Southern_Table_w_pencil_drIt’s taking longer for me to complete a project than it use to. Before, I would run through a project cycle in a couple of weeks. Today, with my other job nicking my shop time, I’m lucky to complete a project in a couple of months. Spending too long on a piece makes me slower and tends to drag down my interest, so I decided to begin a second project. While the time to completion on one project pushes farther out, I’m able to maintain interest and enthusiasm by switching between the two ongoing projects.

The second project I began this week is the above pictured writing table found at Colonial Williamsburg – my first exposure to it was in the book “Southern Furniture 1680 – 1830” (Harry N. Abrams, Inc.). I’m not sure why I’m so captured by southern furniture. I expect it’s due to the simplicity of the designs.

Grain Choices

This project build begins with the legs. As I pulled lumber off the rack, I thought about what makes legs look the best. My first thought is that it depends on the wood. I’m building this table with mahogany, and its feathered grain does not show a strong difference between flat-cut and quartersawn woods, especially in pieces that are 1 9/16″ wide. On the other hand, maple does show a strong difference when comparing the two cut types. So what do you look for? The photo above shows the three ways most lumber is cut, and how each would appear in a leg found on this table. When you see this, I hope it’s obvious which cut is better choice. It’s rift cut. In rift-cut lumber, all four faces of the legs closely match in grain appearance.

WrongCab - WrongIf you build using rift-cut stock, tapered legs look best, whether you’re cutting a two-sided taper or are tapering all four sides. An even bigger difference is found if this same philosophy is applied to cabriole legs, but you also need to align your grain in the right orientation with legs found on Queen Anne and Chippendale furniture. Here’s what I mean. If you align your cabriole leg so the foot is across the grain, as shown above and to the left, you get rings or circles at the knee of your leg. These circles are not appealing, but the issue is more than aesthetics. That circle pattern indicates a weakness as you slide down to just above the ankle. That’s where your leg can break as the grain crosses the narrow cut of the leg.

RightCab - RightIf you orient the foot so it’s with the grain, as shown to the left, you get a much stronger and more pleasing end result. Notice there is no ring at the knee. The grain runs pretty much up and down the entire leg. That means there is no weak point at or above the ankle. This leg should not fracture during its life because the weight is carried through the leg as it follows the grain.

These are simplistic examples, but it should be clear that you need to watch the grain direction of your legs. If possible choose rift-cut lumber, and if you’re working up a set of cabrioles, make sure to point your toe with the grain. I know that it’s not always easy to follow these guidelines. If you find that you have a couple of legs cut using the best grain and a couple that aren’t, use the better legs at the front of your project. Ever hear the saying, “Put your best foot forward?”

Build Something Great!

Glen

5 Comments

Filed under Back to Basics, Design, Shop Tips