Tag Archives: table saw

Another Break-away Joint

In a couple of articles I’ve written and in my DVD on a Massachusetts High Chest of Drawers, I’ve shown and described a technique used to attach drawer blades to the case using a socket that is made as you break away waste material. While working on a sample project the new 360woodworking.com website, I used that same technique – but this time, I installed corner braces on a Shaker Stool copied from a Hancock community original.Stool_1 (You can get the entire sample project off the 360 website when it goes live later this week – register at the site to get automatic notification when the site does go live.)
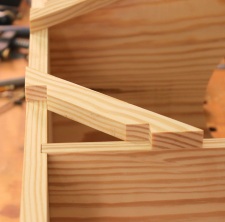
The technique begins by positioning the braces and transferring the profile to the top and end of the stool. The process is simple as long as you align the braces in the correct orientation. Then it’s a matter of tracing the edges of the braces using a sharp pencil (or marking knife, if you prefer).

After the layout is extended down the two faces of each part, saw on the waste side of the lines to define the socket. Next, cut the waste area into small sections around an 1/8″ in width, working from end to end of the socket. Stool_3Because one end of the socket is angled and the other straight, it’s better to slightly angle your saw position as you cut – I begin on the square end of the socket, and twist my angle as I work toward the angled end, all the while maintaining the 1/8″-wide sections. Make sure to cut to the base line and not any farther. Staying short of the lines means you’ll have more paring to do to clean-up the bottom, but going beyond the lines could result in making new parts.
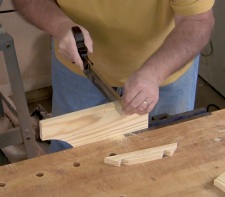
To break away the small sections, simply slide a chisel into the saw cut that defines one end of the socket. Stool_4That action alone should snap the sections right at the base line. I slip my chisel into the opposing end of the socket to make sure the sections are all loose. To complete the socket, pare the waste as you would a dovetail socket – be dead flat or a little sloped toward the middle of the board. With the waste removed, the braces fit in position and hold the stool square and strong.
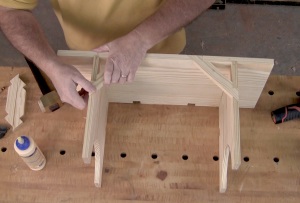
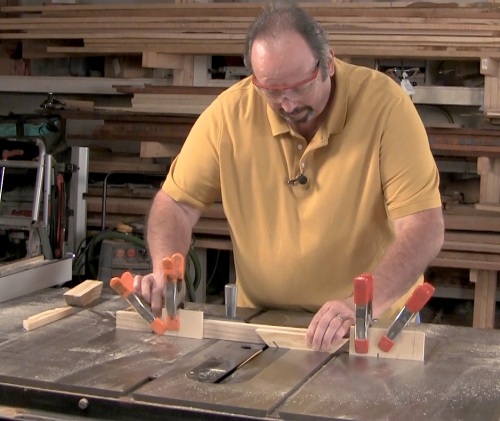
If you’re wondering how the braces were cut to shape at the beginning, that’s a nifty jig shown below. You can get the entire run down of the jig and how to set it up and use it when the 360WoodWorking site goes live. Sign up today.

Stool_Multicam_1.00_05_03_12.Still003

Build Something Great!
Glen

3 Comments

Filed under Uncategorized

Two of My Top Ten Gripes

Woodworking is a great way to make a living. There are, however, problems with even this career. This week I’m posting two of my current top ten gripes.

Bump-cutNumber one on my list – this specific gripe stays at number one or number two throughout most of the year – is the safety police. If this is you, please know that it is not your job to constantly point out things that you consider too dangerous. The fact that I don’t have on safety glasses and ear protection as I work at my table saw or run a router is not the end of the world. These particular violations have been pointed out so often that we all know the rules. If you feel you need to wear glasses every time you step into your shop, then do so.

Number two this week are those that hear someone state a woodworking rule, but do not hear or understand the exact meaning of that stated rule. Case in point: Don’t use your table saw fence in conjunction with your miter gauge, and never glue cross grain.

This past week I posted on the Popular Woodworking Magazine (PWM) blog about bump-cut tenons. This technique has been used for years and years – someone commented that they had seen Norm Abram use this on New Yankee Workshop. The rule that should be followed is that you should not use your table saw fence in conjunction with your miter gauge IF YOU ARE MAKING A THROUGH CUT. That last portion of the sentence is the real message. If you’re not cutting through, use your fence and miter gauge as you see fit.

Another rule is that if you glue cross grain your board will split. I ran into this problem way back in another post on the PWM blog dealing with case sides in lowboys. It has also surfaced when working on the returns around slant-lid desk lids. Both can and often were glued fully.

IMG_1060Take a look at the this photo. What you see is a torn-apart bookcase side that I assembled in 1977 or 1978. (It was a bookcase for a high school sweetheart who broke up with me before I finished the top section.) These boards have been stored in a stone-walled basement of an old farmhouse, been moved from house to house in six moves and have been stored in my garage for the last 20 years. This week I went to re-purpose the wood to knock out a couple small drawers. I tried to knock off the blocks with my hammer, then tried to hook the claw of said hammer under a corner to split the pieces apart. No luck. Finally I drove a screwdriver between the two pieces and the split was made.

In the photo you can see that the regular yellow glue did not fail. What failed was the wood. While this glue-up was across only about 8″, I think it shows that it’s possible to glue in this manner and there are certain circumstances when it is OK to do so. You just need to know the rule – the exact rule – and when you can bend it. (I always glue the first 4″ to 6″ of moldings I use on my projects.)

Please don’t blindly follow what you hear or read.

Build Something Great!

Glen

11 Comments

Filed under Back to Basics, Shop Tips

Another Woodworking Jig

My friend Dave Griessmann and I traveled up I-71 last night to visit the Columbus, OH. stop of The Woodworking Show. Actually, we went to meet with Chuck Bender who was presenting seminars during the show.

As Dave and I walked around the show, I got a look at a table saw sled shown at the left. The sled at the show reminded me of the ones prevalent at Marc Adams School of Woodworking. SAMSUNGAdams has taken his sleds the extra step by adding on a thick block on the front side of the jig in which the blade is buried as your cut is completed. This, I’m confident, is to lessen exposure to students unfamiliar with everyday woodworking. Adams also nails a stop to the benches that surround his table saws to keep the jig from sliding any farther forward, also keeping the blade buried in the attached block.

I’ve always been partial to a sled design made popular by Mr. New Yankee Workshop. IMG_0722In fact, I have built and used a sled similar to the one shown at the right for many years. It’s easy to build, simple to use and the only downside I see is that there is no support for the cutoff piece – it falls to the tabletop. That’s not a big deal because I use this jig to square panels or cut at 90 degrees, so I’m mostly trimming the ends and the cutoff is waste.

Another reason I chose this jig design is because you can cut over-sized panels; those larger than the jig base. The jig shown at the top cuts panels only as wide as what fits between the rails or inside the jig.

IMG_0723

I like this jig so much I built a smaller version for use on my Bosch Job-site saw that I use when traveling.

If you’re interested in building this jig for your shop, Popular Woodworking Magazine has posted the article I wrote for a Jig Journal column online. Click here.

Build Something Great!

Glen


2 Comments

Filed under Jigs, Shop Tips

My Favorite Woodworking Jig

I have only a handful of jigs in my shop and not one of which has a sliding T-track attached to it. I find “tricked out” jigs a waste of time and more often than not they are useless. The best jigs are those that are simple to make and easy to use.

A short list of plywood jigs found in my shop consists of a square platform jig used to create short sliding dovetails to join drawer blades to case sides (written about in the November 2008 issue of Popular Woodworking Magazine), a simple fence extension that rides my Unisaw fence to keep my hands above cuts and out of harms way and a large tenon jig used to hold pieces vertical as I cut tenons. (This jig is explained in detail here.)

There is one other jig that I have to call my favorite – it’s a right-angle assembly that has many duties. In the opening photo, I’m using the jig to hold a case side as I transfer my dovetail pin layout. As used here, you get a handle on how it’s made and about size. Face pieces are 5 1/2″ wide and the overall length is 20″. There is enough width to keep panels balanced, and the length allows you to easily grab piece using spring clamps.

To hold the two pieces at a right angle I installed a couple simple braces with two screws piercing each face. When using the jig to hold panels, those braces are perfect to store  your clamps to keep them from getting too far away.

Panel work, however, was not why this jig was originally built. I have always been frustrated with fences provided with most band saws. I find the drift of my band saw blade before I attempt to rip or re-saw lumber. I can count on one hand the number of times that my drift was exactly 90 degrees to the band saw table and most fences do not have the ability to lock at small angles. To correct that problem, I use this jig along with a couple clamps to lock my fence at the needed angle to get the job done.

This week I discovered another use for my right-angle jig. As I worked at my router I had mounds of router shavings being cast over my table saw – my router, at the present time, is mounted in my out-feed table. (That’s turning out to be less than ideal.) To stop the spread of feather-like shavings, I sat this jig just behind the router bit to acts as a backstop.

A good jig has many uses. And it doesn’t take a Harvard degree to understand how it’s used.

Build Something Great!

Glen

4 Comments

Filed under Jigs, Routers

Southern Yellow Pine: A Quick Fix

With the book Furniture in the Southern Style out, my desire to build more than a few pieces from the book’s collection skyrocketed. Add in the fact that my customer has quite a few pieces on the list that are adapted from south of the Mason-Dixon line, and you can see that I have the need for a couple hundred board feet of southern yellow pine (SYP) for secondary wood if I intended to stay true to the original designs. I needed rear drawer dividers and drawer runners quickly, so I turned to my local home-center store.

Any SYP you get at these stores – if your store carries SYP at all – is most likely going to be construction lumber, and it’s going to be at too high a moisture content for furniture. Don’t let that stop you. You can take a couple boards, mill them oversize and allow them to dry, then bring the pieces down to finial dimensions. As you can see in the top photo, a silk purse can be made from a sow’s ear. Or for you highfaluting woodworkers,  you can get nice lumber from construction-grade yellow pine.

It goes without saying that quartersawn lumber is the most stable, so that’s what to look for in your quest. Take a look at the rack of yellow pine at the store shown in the photo above left. You can see that most boards could yield rift sawn lumber, but if you take a close look at the bottom board (of course it’s the bottom board!) you can see how it is cut right at the center of the tree. See the pith? If you cut away the pith you have a width of quartersawn lumber left over.

I snagged a few 8′-0″ 2 x 12s and ripped out a nice selection of yellow pine to use. I let it sit in my shop for about a week, before putting some of it to use. (If you stand the boards vertical to dry it seems to increase the drying rate slightly.) Here’s a close-up look at my stock prior to final milling. Growth rings are tight and the majority of the lumber is quartered with the balance rift -cut.

Keep in mind that I only grabbed enough to get me started on a project. In the long run, I ordered and received a nice supply of rough-cut SYP from a local source here in downtown Cincinnati, Shiel’s Lumber. I highly recommend them if you’re in the area and need southern yellow pine.

There is one thing that I do want to warn you about if you choose construction-grade lumber. Higher moisture content means more wetness. More wetness means there is a possibility of rust on your tools. I stacked lumber on my table saw for only a few minutes, and there was enough water purged to get the rust gods working.

Build Something Great!

Glen

3 Comments

Filed under Shop Tips