Category Archives: Finish Techniques

Best Tool for the Job

Something that I preach is that we woodworkers should use the best tool for the job. It that’s a table saw, jointer or big-honkin router, so be it. It the best tool is a handplane, egg-beater drill or sharp chisel, go for it. Mitersaw_cutTo be wholly dedicated to one woodworking discipline while ruling out others is nuts.
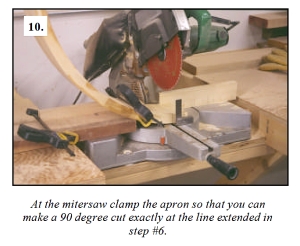
The story I like to tell is a tale on myself. When I built the Baltimore Card Table article for Popular Woodworking Magazine, I was more dedicated to power tools even though I used hand tools. In one of the early steps of the build, I needed to trim the ends of the brick-laid apron. I spent 20 minutes or more setting up the cut at my miter saw. Of course, the cut was square and right. (See the image from the article above.)

Years later, after hand tools began to play a bigger role in my day-to-day woodworking, I taught how to build that table at a woodworking school. When the time came to trim the apron, I grabbed my pencil and square, laid in the lines then made the cut using a hand saw. Of course, the cut was square and right. The difference was that I did not spend 20 minutes setting up the cut.

What’s important is to choose and use the best tool for the job.

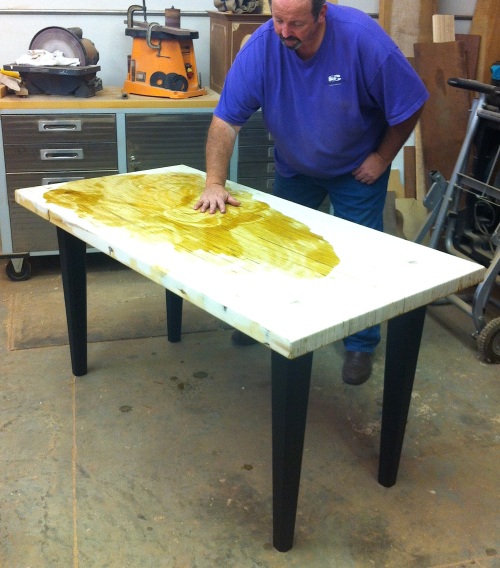
In the photo below, I guess the tool would be classified as a hand tool. I  know, however, that it is the best tool for the job. Why? No only does this tool make spreading the oil/varnish mix quick to accomplish and easier to direct finish were it’s needed, the process also warms the oil ever so slightly to better allow mixture to soak into the surface.

OV_LVL_1

Build Something Great!

Glen

8 Comments

Filed under Finish Techniques, Methods of Work, Shop Tips, Shop Tool

Inlaid Box #4

IMG_1752I’m sure you’ve heard the saying “never send a boy to do a man’s job.” That holds true for magnets, too. After hinges were added to the inlaid box, I drilled and installed two rare-earth magnets to hold the lid closed. Working in only 1/2″-thick material, I decided to use smaller-diameter magnets. After drilling the first hole and wanting the two magnets to line up, I used a 23-gauge pin as a center finder to mark the lid location for the second magnet – it worked like a charm. I epoxied the magnets in place and went home for the day.

CombinedA

The next day, I dropped by the shop on my way to work just to check my magnetic lid setup. The magnets looked great. They were perfectly aligned. There was not enough pull, however, to hold the lid closed. Crap! Now I’d have to pull those magnets, repair the box and lid from the destruction of pulling the magnets and come up with another option to hold the damn lid closed. I thought about it for a couple days then decided to stay with the magnets, but increase the size. Go big or go home, I guess.

IMG_1747With the repairs made and the two magnets holding strong, I was ready to apply a finish, so I mixed up a little oil/varnish finish for the box. I’ve used this finish on many pieces of furniture, including a Shaker sewing desk and a Seymour marble-top sideboard. It’s easy to make and easier to use.

Mix 1/3 boiled linseed oil, 1/3 spar varnish (spar adds a bit of elasticity to the finish) and 1/3 turpentine (I’m told you can use mineral spirits as well, but I’ve never done so). That’s it. For larger jobs, I mix enough for 1-1/2 coats, then eliminate the turpentine (50/50 varnish and oil) as I add to the mixture. The turpentine simply thins the mixture so it can soak into the grain; you only need this on the first coat.

Finish

Brush the mixture onto the project and keep everything wet for about 5 minutes so the finish gets deep inside the wood pores. After five minutes, wipe away the excess. If there’s no excess, you didn’t apply enough finish. Let the project sit until the finish is dry, then apply another coat. On later coats, because the finish is only oil and varnish, you need to let things sit until the mixture feels like honey before wiping off excess. And if you missed a spot when wiping things clean or if you have a rough texture in the dried finish, take #320-grit sandpaper and sand the surface smooth.

The opening photo shows the box with its first finish coat applied. It takes three coats to build a protective finish, four coats starts to build a sheen and with each additional coat, the surface becomes even more shiny. Like I said, easy.

Build Something Great!

Glen

5 Comments

Filed under Finish Techniques

Egerton Clocks & Shellac

IMG_1651 2I’ve learned a great deal  as I progressed through the school of hard knocks to become a professional woodworker. What keeps me involved in writing this blog, magazine articles and teaching, and why you should take advantage of my experience, is the fact that as a professional woodworker, I can help you more easily learn woodworking so you don’t have to pay all of your dues. You get to walk through a few doors instead of having to break them down.

Some of the things I learned are general knowledge, such as a highboy base is not the same as a lowboy even though they appear to be the same – I remember how struck I was when I first discovered that. And some things can be applied to every project; or not. As I began to apply shellac to the tall clock, I was again smacked with the idea that all the parts for your project should come from the same tree, if possible. While that’s not always possible, it is a great concept and should be in your mind as you set about a new build. Why? Mostly due to aesthetics.

TonerOn these two clocks, the mahogany was from many sources, especially the veneered base and door fronts. I found that I needed to adjust the tones and colors. As a result, finishing without using dyes or stains becomes a bit more important. TranstintIn an earlier post about the walnut secretary, I wrote about adjusting the finish using toners. Toners, in aerosol cans, are tinted lacquer. In use the lacquer becomes layered between coats of shellac forming distinct divisions in the finish. This time, I stuck with shellac, but added drops of Transtint dye to introduce color. Shellac melts into shellac, so the finish developed is one harmonious layer. Is this better than toners? On that I’m still trying to decide, but it’s nice to have choices.

SAMSUNGAfter I had adjusted the colors to where I think the tones were even, I applied a layer of amber shellac. Of course, I didn’t have any in the shop, so I shuffled off to the local hardware store to pick up a quart. Surprise. The store had six quarts on the shelf, but of the six quarts, not one was usable. Not only were the quarts outdated, most were from 2007. (sorry for the blurry photo, but I had to show the grouping.) If you’re a regular reader of this blog, you know my thoughts on shellac, and you by now know how to make sure shellac is worthy of a purchase. (If you’re not sure, search this blog for information.)

SAMSUNGThe shocking revelation was that these cans were so old they were marked using the older Zinnser system of dates instead of a code. And the dates was printed on the bottom of the can, which if I remember correctly, was a full generation earlier (prior to the code, dates were marked on the lid.) A word of caution: Check the shellac cans and dates prior to any purchase and choose shellac that is less than three years old.

Build Something Great!

Glen

4 Comments

Filed under Finish Techniques, Methods of Work, Tall Clock

Finish Ready

IMG_1511This is a day long coming. My Egerton tall clocks are ready to begin the finishing process; I’ve completed the work and sanded each clock to #180 grit. As you may have guessed, there is no dye or stain going on the clocks – that would mask the contrast between the mahogany and the inlay. Step one is an application of boiled linseed oil which should produce an unbelievable look.

There is a lot of real estate on these clocks, so brushing on the oil may take some time. (I’ve never sprayed boiled linseed oil, but there is always a first time.) It’s after the coat of oil when I see how the clock should look when finished. Of course, with shellac, even clear shellac, things will get a slightly darker.

You may have noticed that the reeded columns are not attached to the hoods. This is on purpose. Columns fit to the hood in the brass capitals. If I had attached the columns, all my finished would have been over the brass – not a good idea. Each column will be finished independently, and installed afterward. Same with the glass in the hood doors.

The crowning touch are the brass finials that fit at each front hood corner, as well as the center of the hood between the carved rosettes and above the inlaid nightcap.

I’ll share a photo of the clocks when the finish is complete.

Build Something Great!

Glen

16 Comments

Filed under Finish Techniques, Tall Clock

The Secret To Clean Can Rims

IMG_0555I hate build-up that gathers around lids of finish. Pick any finish. Whether it’s, paint, shellac, lacquer or something else, if you pour it from a can, sticky goo comes to visit.  As you pry open the often-stuck lid, crap gets on your screwdriver or on your hands or gloves. Goo is easily transferred to your project and that’s worse than glue spots – OK, nothing is worse than glue spots.

If you think all you have to do is use a brush to clean the rim as you put the can away,  you’re wrong. Junk, partially dried to become sticky, remains in the rim valley. If it would simply dry, it would be good. That’s not the case. For years I suffered with gooey can rims, but no more. I discovered a secret.

IMG_0556The secret is a #6 finish nail and a hammer. You could use a #8 finish nail, but there is no use dropping down to a #4 nail – a hole that small is not going to help.

Take a nail then puncture about four holes per quart can, or five holes per gallon can directly through the valley formed at the rim. It’s easy. A couple taps with a hammer and you’re through. (You can use a big-boy hammer if you do not have one from a kids tool set like I do – remember these?) After you have your holes made, any product left in that valley seeps back into the can. Now you know why a #4 nail hole doesn’t do the job.

It’s even better as you replace the lid. Any product left in the rim is then forced through your holes and not over the rim only to run down the can. You can only imagine the sounds made inside the can as you hammer the lid; a giant squishing noise as shellac spurts back into the can. With the lid in place, no air seeps into your can to ruin the product. It’s so clean.

IMG_0559

Build Something Great!
Glen

Leave a comment

Filed under Finish Techniques, Shop Tips

Videos: From Woodworking in America 2012

From October 12 – 14, 2012 I taught three different sessions at Woodworking in America – West Coast in Pasadena, California. Two of the same sessions were taught at Woodworking in America – Midwest some three weeks later from November 2 – 4. During my sessions, I played short video clips that emphasized various points I thought important. After the conferences, I received many emails asking that I post these video clips on my blog.

If you attended one of my sessions during the conference, these videos make perfect sense. If, however, you did not attend my sessions, or even one of the conferences (Shame on you!), some of these short clips might not be all that they could be. But I think you could still garner a nugget of useful information. If you have comments or questions about the techniques covered in these clips, as always, add a comment at the bottom of the page. I will respond ASAP.

Build Something Great!

Glen

Doors: Types, Tips & Techniques

The Mighty Dovetail

Finishes That Pop

2 Comments

Filed under Finish Techniques, Jigs, Joinery, Power Tools, Routers, Shop Tool, Video

Shortcut To Experience

I don’t think there is any better teacher than experience. The only problem with experience is that it takes time. Lot’s of time. There are, however, ways to bypass that huge time drag and gain from experience quickly. You’re not necessarily getting experience, but you are learning from experience which is the next best option. How do you gain or learn from experience? You learn from those who have already paid their dues.

This week I’m writing about Popular Woodworking Magazine’s Woodworking in America (WIA) conferences. At the bottom of this post is a short video that sums up my thoughts on the conferences,  just what you stand to gain if you attend and why you should be there. Between here and there, I’ll briefly describe the sessions at WIA in which I share my experience.

In “Finishes That Pop” – the title really says it all – I’ll discuss the steps needed to bring a great finish to your project. There are so many areas of woodworking in which small missteps add up to a major disaster. Finishing is at the top of that list. In more than twenty years of furniture construction, I have experienced more finish faux pas than one could expect. (I will never say I have seen it all because there is always something new around the corner.) As a result, I have picked up a number of finishing tips and tricks. For example, did you know that there are times when you should final sand using #120-grit sandpaper, that wood coloration is best done with a good soaking instead of a controlled wipe or that on certain hardwoods applying a coat of oil is great while on others you are simply wasting your time? And just how many coats of oil/varnish does it take to build the right sheen? That’s just the beginning. In the sessions we’ll discuss much more.

In the “The Mighty Dovetail” we’ll examine what has become the joint of all woodworking joints. Today, unlike centuries back, you are judged on how well you cut and fit this joint. That’s a shame because this joint has uses that do not – read that again, please – do not require you to spend huge amounts of time making exact cuts. In fact, After I walk through how to hand-cut this popular joint, I’ll share where you can take a few shortcuts, show to create this joint using a jigsaw and demonstrate how to speed up your process without jeopardizing a hand-cut look. Then we’ll spend time learning where, in building furniture, dovetails are a great choice and some areas to avoid altogether. If you are a dovetail devotee or newbie, this session will open your eyes.

I have often said that if you know case construction (as in dovetails discussed above) and you can build a drawer and door,  you have all the tools needed to produce any piece of furniture. In “Doors: Types, Tips & Techniques” we’ll discuss all things door, including mortise-and-tenon joinery, mitered sticking and creating raised panels. I’ll share my techniques for producing door panels of all kinds, and the best angle to tilt your table saw to produce a perfect fit into a frame groove. I’ll even talk about hand planes and raised panels, too. In addition, I’ll share the technique and the story on why I learned to construct glass-door frames so they were rabbeted for glass right off the table saw – no more frame assembly then routing the rabbet.

These are just my classes at Woodworking in America. There are so many other presenters that I know you’ll come away from these conferences a better woodworker. (Click here to register for a conference, or both conferences, or to read about other presenters and classes.) And as you’ll see in the video below, that is what this is all about. I hope to see you there.

Build Something Great!

Glen

3 Comments

Filed under Design, Finish Techniques, Joinery, Shop Tips

Decode Your Shellac

I use shellac on nearly every project that passes through my shop doors. I think it is the best product for furniture because it is easy to use, can be brushed on or sprayed, and  dries quickly compared to urethane. I use shellac on top of aniline dye and even on top of a coat of boiled linseed oil if I aim to highlight figured grain. It is my “go to” finish before and after glaze. As you can tell, shellac is, in my opinion, the perfect topcoat. I’m good with shop-made shellac from flakes and I use store-bought shellac from Zinsser.

Until recently, my only problem with shellac – all shellac – is that I do not care for the high sheen that comes when shellac is built-up as a finish, but I have found a great work-around. I apply a coat of dull-rubbed effect lacquer, or I rub-out the surface using #0000 steel wool or an equivalent. Over the last year or so, I have developed a second problem with Zinsser shellac purchased from hardware stores or the large home-center stores.

As you undoubtedly know, shellac has a shelf-life. From the moment it is mixed into solution, it begins to degrade – degradation effects drying times. Eventually, as the degradation continues, you end up with a gummy mess with which to deal. Experience taught me this lesson, so I watch my dates closely.

A while back, Zinsser switched from using a date stamp on can lids to a lot number. With the date stamp, and the fact that the company-issued literature states its shellac was good for three years after the stamped date, you had a good idea as to when the shellac would reach it’s end. Even today I can go into a local home-center store and find shellac in gallon cans with a date stamp of 2008 – in 2012, that can is not one I’ll purchase.

With a lot number, there was no way to tell when the shellac was mixed. Or so I thought. I contacted the company, explained my dilemma and was pleasantly surprised when I received a reply that same afternoon. I now know how to read the lot number to tell when the shellac was mixed. Here is the information.

The first number after the letter is the year the shellac was made. If you look at the number in the photo, you see a zero. That shows the year at 2010. The number one would represent 2011 and a two is for 2012. Easy enough. That’s probably all the information you need, but the company goes further.

The first number after the year indicator stands for the month of mixture. In this case there is a seven, so this can of shellac was mixed in July. If the month would have been November you would see an “N”, December is a “D” and all other months are numbers.

The two numbers printed after the month identifier are the exact day of the month on which the shellac was mixed. In our example that day would be 20. This can of shellac was manufactured on the 20th of July, 2010.

With this information at hand, there is no reason to purchase shellac that is past or very close to the date of expiration put forth by the company. This also gives you the assurance that the shellac you buy is good to go. Below is another can lid for you to work out.

Build Something Great!
Glen

5 Comments

Filed under Finish Techniques, Shop Tips

Weather Wallops Woodworking

Not much woodworking was accomplished this week in my shop. My area of the country, like many areas around the country, was covered in triple-digit temperatures. My option was to work in the shop for a few hours during the mornings, then close up and move back to my air-conditioned home office. Of course, I could stay in the shop, but only if I stood in front of my fan dressed only in my boxers. (Not photos included – you’re welcome!)

Due to humidity levels edging higher, I put off the final coats of the walnut secretary. That should happen this coming week if weather forecaster continue their fantastic accuracy rate. (Note the sarcasm.)  I did manage to slap a couple coats of paint on a small four-drawer chest and to finish construction on a block-front chest that was started a year ago. I even went as far as to apply aniline dye to the chest and spray on a couple layers of shellac. Damn the humidity.

What was interesting about the block-front was the two distinctly different mahogany woods used on the piece. My case was a nice pink shade – all the lumber came from a single source. For my drawer fronts however, I had to use 12/4 stock and its color was much deeper. Not only that, as the piece sat around my shop for the year, my drawer fronts changed far greater than the case did. Below are photos of the different mahogany used. While you may not notice a huge difference in the photos, in person you could see vast variations.

Case lumber.

Drawer front stock.

To overcome these variations, I decided to dye my case as I normally do – soak the piece until I get dye dripping off the surface, let it stand for five minutes then wipe away the excess. As I began finish on the drawers, I decided to brush on a single coat and immediately wipe off any excess.

After the first drawer was dyed, I pulled out my hair dryer to fast-track the drying process – a good tip if you’re in a hurry – before sliding the drawer into the case to see if my hunch was correct. To my surprise, the drawer front was lighter than the case, so I applied a second wipe-it-on-wipe-it-off dye coat. This time, as I slid the drawer into the case, the color looked close enough (see the chest in the opening photo).

Not only should you try and use lumber from a single source, but rules – in this case how aniline dye should be applied – are made to be broken. Maybe that should read adjusted.

Build Something Great!
Glen

2 Comments

Filed under Finish Techniques, Shop Tips

Self Promotion & Follow-up Information

This week I am using my blog to promote an upcoming class at The Connecticut Valley School of Woodworking (CVSW), and to provide additional information on past posts.

Beginning July 23, 2012, I am teaching a week long class at CVSW titled “Get it Done! Efficient Joinery Techniques with Glen Huey.” The project is a hanging wall cabinet that, by itself, is a great woodworking project. The case is a dovetailed box with an applied, beaded face frame. There is also a raised panel door and small drawer in the mix. That covers most woodworking techniques. If you conquer those techniques you could build almost anything.

But we are not just covering those techniques. During the class you’ll produce hand-cut dovetails and learn how to speed up the process without sacrificing appearance, discover secrets to better and more efficient face frame joinery including half-lap and mortise-and-tenon joints, uncover the tricks to perfect sliding dovetails and learn shortcuts to produce raised panel doors. In other words, we will “fast-track” your abilities in the shop and eliminate the need for allowing experience to be your teacher.

There are a few openings in the class, so contact Bob Van Dyke at the school and sign up.

Follow-up Information

In a May blog post, it was suggested that I setup a page on the site dedicated to woodworking questions. You may have noticed a new page as you landed on my homepage. I began the page with the blog entry from May 13. 2012 and have added a couple new questions and answers. It is worth stopping by this page every once in a while to check out what is new. And by the way, please continue to send me questions. As you do, the page fills and information is shared. Also, if you take issue with my answers, please leave a comment. I am always interested in different and new ideas, too.

Finally, I want to direct you to my May 21, 2012 post where powdered shellac is discussed. I have added new information at the end of that post that talks more about powdered shellac. Click here to jump to that post.

Build Something Great!
Glen

3 Comments

Filed under Finish Techniques, Questions, Shop Tips