Category Archives: Veneer

Dressing-up the Keystone

IMG_1394
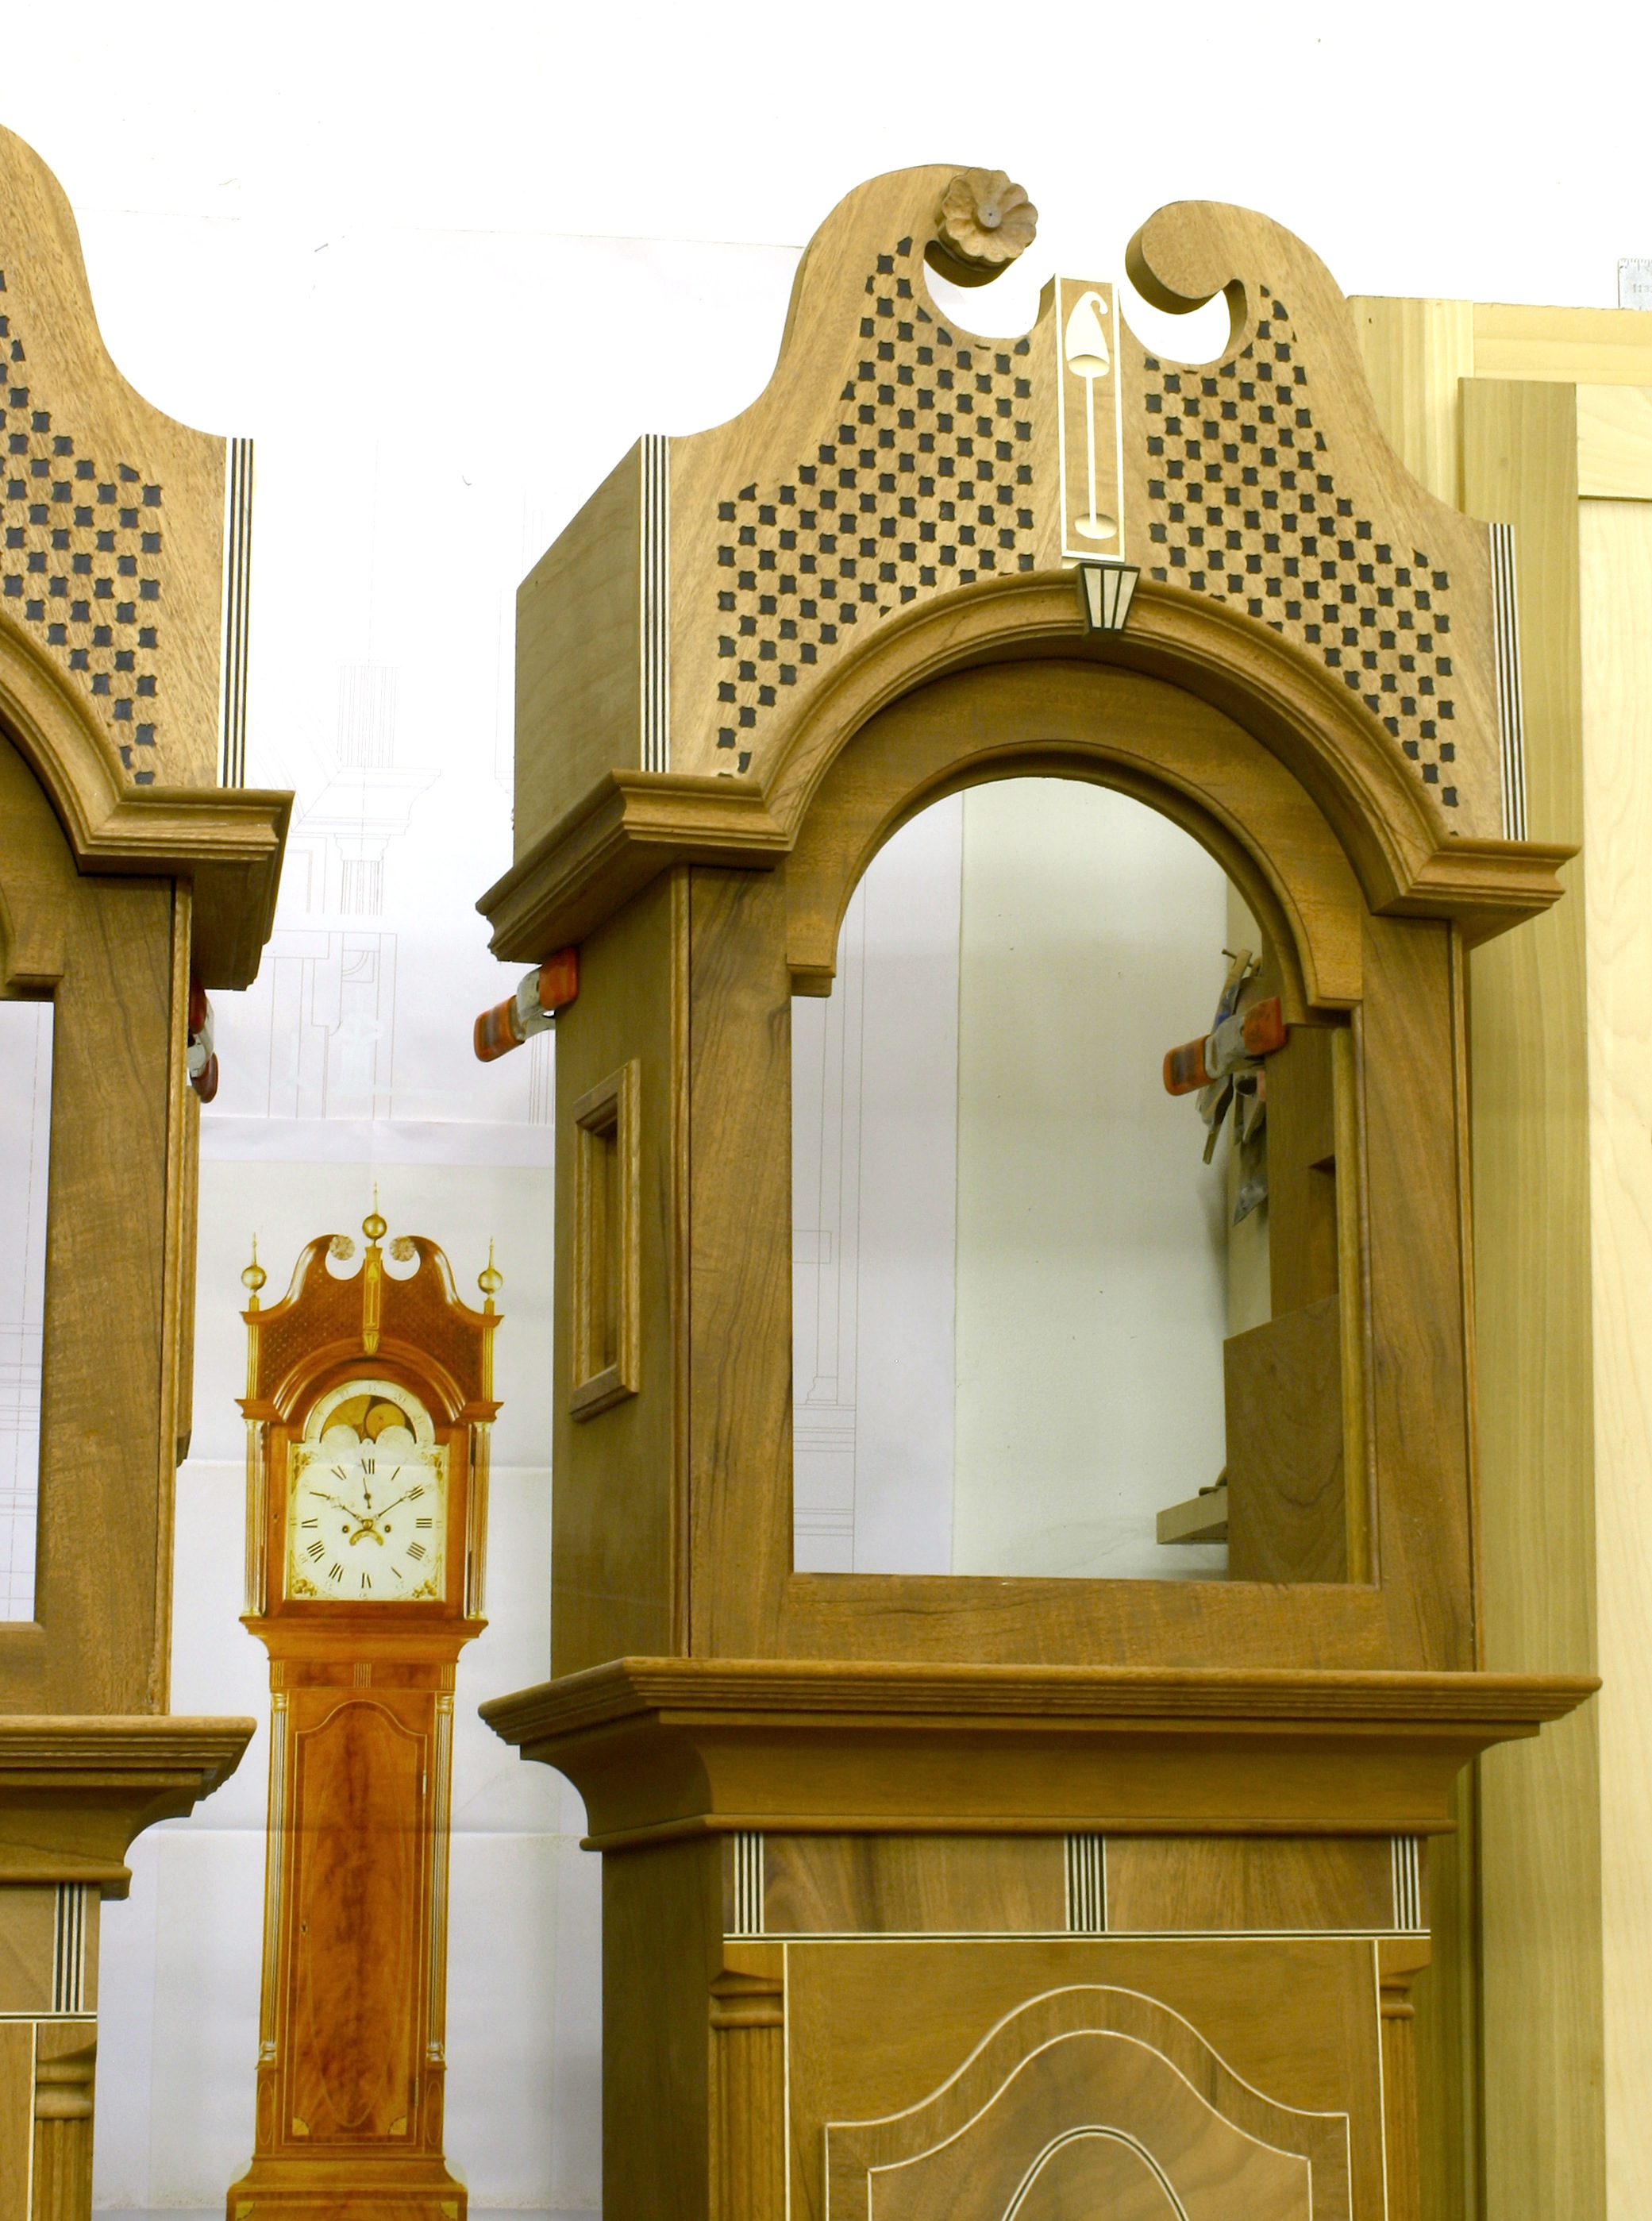
With the moulding installed around the arched opening for the dial, there’s one last detail on the hood before moving on to the goose-neck mouldings of the broken-arch pediment. The Egerton tall clock has a small keystone that separates the two pieces of the arched moulding. The keystone is made from solid mahogany, but the face of the piece is a small assembly of veneer. And by small I mean 5/8″ wide at the bottom, 1-1/4″ wide at the top and about 1-1/4″ from top to bottom. That’s not a lot of inlay, so I can easily get that from scrap pieces already on hand. (Check out the photo. You can see a picture of the original clock between the hoods of the two clocks I’m building.)

To get things started, I thought it best to lay out the design to better get a feel for the pieces and steps. That also made it easy to get the sizes of the maple veneer just right, IMG_1381and that made the work go much quicker. After I had the design, I snapped off pieces of the ebony stringing and cut the small pieces of maple from a leftover sheet of shop-made veneer – I’m tired of sanding through the 1/40″- or 1/64″-thick commercial veneer and vow to never purchase it again. To make sure things went as planned, I stuck the pieces to a piece of tape, then checked the size against the actual keystone.

I was now ready to stick the pieces to the keystone. With a thin layer of glue on the keystone, I positioned the veneer and stringing. IMG_1382(Again, I really like the Titebond No-Run, No-Drip Wood Glue.) A neat technique was to lock one leg of my spring clamp into my bench vise, leaving the other leg operable. This allowed me to easily move or reposition the keystone in any way necessary. At this time, I wasn’t concerned about the length of the pieces applied to the workpiece. I didn’t want them to run past the top and bottom, but I also didn’t need them to be perfectly aligned. After everything was placed and slide to its final position (moving the veneer pieces up or down influenced the overall width of the assembly so I could easily match the keystone face), I set the piece aside to allow the glue to dry.

The next step after the glue dried – about 10 minutes – was to saw the top and bottom edges to add the last pieces of ebony stringing. IMG_1384A marking gauge is perfect to scribe lines to which to saw, and I particularly like a Japanese saw for these types of cuts. With the assembly locked in the spring-clamp vise, I sawed the two lines then peeled the waste parts easily off the keystone. A little more glue was added before I position the two last parts to the face of the workpiece. After the glue dried I used a rasp to level and smooth the inlay, then sanded everything smooth with #180-grit Abranet.

The finished keystone is shown in the opening photo. It’s a small piece that adds significantly to the overall look of the clock. And that’s what inlay does, at least to my eye. Also, if you look at the opening photo you can see the first carved rosette that fits at the end of the goose-neck moulding. I ran through three alliterations before arriving at what I think will work. To get a quick look, I stuck the half-finished rosette in place, then stood back to make a decision. So far, so good. But there is more work to be done.

Build Something Great!

Glen

1 Comment

Filed under Design, Inlay, Tall Clock, Veneer

More on a Punched Scroll-board

IMG_1113I’ve been leery of the Egerton tall clock punched scroll-board veneer from the git-go. Until this weekend my concerns were in how to attach the  veneer – backed by what appears to be speaker cloth – over the scroll-board. If I glue the speaker cloth over the holes drilled into the scroll – holes that are to allow more bell sound to emit as the movement strikes on the hour – I’m sure to get glue on the cloth. That’s not going to work. Also, as I then glue the veneered face to the assembly, once again glue seeps into the cloth and the mess continues.

This weekend I found a new concern. How would I finish the clock if I worked out all the attachment issues? There will be no dye or stain, but I will add a layer of boiled linseed oil to highlight the grain in my mahogany. IMG_1109And with shellac as my topcoat, how the hell would I brush, wipe or spray shellac without filling the open weave of the speaker cloth? I’m at a loss and turning to plan B. Or is that E? Not sure.

The next plan was to attach my punched veneer directly over the scroll-board without using a cloth between. To glue the face veneer to the scroll would be easy, but the holes would be a problem. Some of the holes do not go all the way through the scroll and the look in a mocked-up sample was less than stellar. I used a brad-point bit to cut my holes. The center point of the bit left a nasty look in any holes not drilled completely through. IMG_1108Maybe a spoon bit and a brace? Too much work. A round-nose router bit plunged into the scroll? Too much rigging, With another quick look at that arrangement, I knew it was out. Next idea, please.

My mind scrambled for an answer. How about black veneer behind the punched-out face veneer? Finishing would be OK. Oil and shellac would work fine on top of the veneer. The look would be similar. Where was the problem? (There had to be one, right.) Sound. That’s it. The idea of the cloth and holes was to elevate the sound of the bell ring. No holes equals less sound. It’s OK to not have holes in the scroll-board. Most clocks don’t and the sound of the chime is still heard. I moved forward.

IMG_1110Black-dyed veneer was cut and fit to the punched face veneer. A thin layer of glue was spread and the two veneers were sandwiched between wax paper and two make-shift platens. Clamps held everything flat as I waited to see my results.

As the glue dried and I worked on other areas of the clocks, Dave Griessmann, a friend who spends time in my shop on Saturdays – he also forces me to have doughnuts in the morning and lunch at BW3 – suggested that I still place a few holes through the scroll-board to help with the sound. Good idea. I think sound would increase if it only had to pierce two thin layers of veneer. A few well-placed holes are being considered, but that decision can wait until later.

Being the visual woodworker that I am, I thumb-tacked the veneer sandwiches to the hood and stood back to take a look. That’s what you see in the opening photo (click on it to make it larger). The contrast is more now than it will be when the mahogany is colored and finished. I like it, but I need some time to decide. You have any ideas?

Build Something Great!

Glen

5 Comments

Filed under Tall Clock, Veneer

More on the Pierced Veneer

After fooling around with shop-made veneer for the pierced hood on the Egerton clock and not being satisfied, I decided to purchase a wood-backed veneer. IMG_1099I went to joewoodworker.com and bought a 4′ x 8′ sheet of ribbon-stripe mahogany. I opted for the backer veneer to run across the grain for added stability – I am punching through most of the veneered front. I placed my order on July 15th. Friday the 19th my veneer arrived. (Joe has great service. I was notified at every step.)

In the shop I cut off a 24″ section from the sheet. The opening photo shows how I went about establishing the angle of the grain, and it shows that I made a mistake as I rushed to get started – I laid out four sections (two pieces for each clock) angled the same direction.IMG_1100 I needed two sets with the grain at opposing angles.

What I am particularly fond of is how easy it is to work with backed veneer. I cut the pieces to size using a pair of scissors. How easy is that? To get setup to do the punch work, I cut a piece of plywood a bit over-sized to act as a backer, then tacked and clamped my patten (slightly adjusted to show areas covered by moldings in the finished piece) to the plywood. I clamped one end so I could easily check my progress as I completed some of the work.

I began by using an 1/8″-wide chisel to cut at each of the four corners of the small patterns in my design. IMG_1102Work was just as with a machine in that I grabbed the chisel, oriented it for one corner then cut that corner in every contorted square. In the left-hand photo you can see the completed run of the first stage of work. I have to say that my hand was cramping as I worked the corners while holding the chisel between my thumb and index finger. I used a light mallet tap to punch the corners.

As I began step two using the small gouge, I decided that my mallet was unnecessary. Mere pressure could cut the veneer. I worked the small squares one at a time, removing the waste as I worked. IMG_1103A couple times the waste would slide under the veneer before I could grab it, so I had to remove the clamp in order to clear the way for the next square. And I could check my progress.

After nearly four hours I finished with the first half of one pierced piece of veneer. When I held it up to the hood, it looked good. What wasn’t good was the temperature. My shop has no air-conditioning, so I loaded up the necessary tools and veneer and took off for home. I could punch the remaining pieces at my kitchen counter.

Next week I’ll give you a look at the two finished pieces. Not bad so far.

Build Something Great!

Glen

1 Comment

Filed under Hand Tools, Tall Clock, Veneer

Punching the Scroll

IMG_1076In April this past year I first wrote about the perforated or punched scroll-board on the Egerton tall clock (read about here). Since then I’ve been working on the details, trying to get patterns complete and finally decide how I plan to go about the work.

This weekend I began experimenting with a couple of different materials to see if one would be better than the other – I have yet to decide if this is the actual process I plan to use to punch my scroll. IMG_1077The first material was a scrap of the backed veneer I used for the clock’s door and base front (click here if you want to take another look).

I placed half of a paper pattern of the scroll onto my scrap and went to work. Each small cutout requires eight stabs, four using a carving gouge and four with my 1/8″ chisel. In the backed veneer, I needed a bit of force to push through. After a number of holes were punched, I took a look at the cutout area and decided this would work. The problem I have withthis material is that the veneer is crotch mahogany. Being crotch, the grain pattern is somewhat wrong for the scroll-board. In the original, the grain pattern is more straight, and it runs at an angle that directs your eye toward the top of the clock – one of the woodworking rules to which I like to adhere.

IMG_1079In order to use a piece of straighter-grained veneer, I had to turn to a paper-back veneer. First I had to see if it works; my primary concern is that the veneer, along the thin connector lines between the cutouts, splits and cracks. My second concern is using a paper-back veneer. I cut a piece of of material, laid the paper pattern on top and again went to work.

After working for about 30 minutes – yes, the work went quicker than I expected due to the material being thinner and because I developed a better routine – I peeled off the tape to take a look. You can see the results below.

IMG_1080

I like the look and either material seems to work out, but I think I’ll pass on the paper-back veneer. This week I’ll make some pieces of shop-cut veneer just so I can get the grain right. And to provide support for those small connectors, I’ll add a cross-grain backer. I expect that the work will be more difficult due to the thicker veneer, but I’ll stay more true to the original and the look should be right-on.

Build Something Great!

Glen

1 Comment

Filed under Hand Tools, Shop Tips, Tall Clock, Veneer

From Veneer To Edge Banding

IMG_0350(A few weeks ago, I posted about veneer and how I purchased 2-ply crotch mahogany for my Egerton tall clock. This week, I’ll pick up from there as I begin tinkering with the base panel and door. If you want to better see the end results, click on the left-hand photo to open the image.)

My next step in building the panels is edge banding. To straighten the veneer edges and to expose areas to which my edge banding is glued, I turn to one of my router jig workhorses. IMG_0520There is nothing easier to use than a simple straightedge jig and a pattern router bit to get a dead-straight edge; Yes, the edge is only as straight as your jig. My jig is a 6″-wide piece of plywood with a 4″-wide piece applied on top – this particular rendition has pine on the top, but any wood or plywood works. After I build the jig, it gets a pass over my jointer to achieve that straight edge. From there I’m ready to work.

I marked my panel at 7/8″ from the edge, IMG_0521positioned the jig at the marks then clamped it in place. The extra 2″ of width allows easy clamping and any clamps are out of the way of my router base. I set my depth of cut to 1/16″, then routed the edge. After working all four edges – the bottom edge being 1-1/4″ to allow a matching 7/8″ after a moulding is attached – I was ready for banding.

Shop-made edge banding is way easier to work than commercially available paper-thin veneers, IMG_0573it’s easy to make and it is from scrap. These are all pluses when woodworking. After cross-cutting 6″-wide pieces to 1″ in length, I set up my table saw to rip 1/16″-thin strips. Make sure you do this using a zero-clearance table saw insert and a push stick of some kind. I also like a super thin blade for this, so I bought a 7-1/4″ saw blade that is dedicated to light work at my saw. Enough pieces were cut to wrap the door and base panel, along with a few extra.

Edge banding is wrapped around the field, IMG_0575but I also needed a few pieces for the top edge of the door that were longer due to the curved edge. I only need a few pieces, so I repeated the same steps with another piece of scrap. Those top-edge pieces require a bit of shaping to meet the profile. That meant many trips between the door and my sanders, spindle and disc. Spring clamps are great at holding profiled pieces as you fit additional pieces along the edge.

After the top-edge pieces are fit and the corners are trimmed, IMG_0581it’s time to glue the edge banding to the door. I contemplated hide glue for this, but my glue pot was  not hot and any hide glue I had was outdated or moldy. Not going to use it. I did have yellow glue, but I also had a bottle of Titebond “No Run, No Drip” glue. A shorter set time was good, so I gave the glue a try. I was surprised at how easy this glue is to use and how quickly it sets. I am very happy with the results. If you need a shorter setup time when gluing, I would try this product.

IMG_0583

Remaining edges are covered with the pieces ripped at the saw. Straight runs are too easy. Smear glue along the edge, slip a piece in place then add clamps. The glue sets up fast enough that I easily transferred spring clamps along the way. If you do not have a large supply of spring clamps, use blue tape. It works, too.

(Next week I’ll repair a damaged edge-banding corner, share a trick for perfectly matched mitered corners and install stringing in the door.)

Build Something Great!

Glen

3 Comments

Filed under Design, Inlay, Jigs, Routers, Shop Tips, Tall Clock, Veneer

Veneer: The Beginning

As I began prep work for the tall clock, I knew I had to have a plan with which to work and I knew I needed veneer for the base front panel and the door. H_ResultsI looked to my normal online sites for veneer, but was not happy with my findings. When I turned to Google for help, up popped Herzog Veneers Inc. (veneeronline.com). Once at the site, I stayed because I liked the many mahogany crotch bundles available, I liked that I could see the individual leaves of each bundle as well as each leaf size and square footage and I liked the fact that there were prices, at least on some of the bundles.

I chose my bundle and worked through the online ordering system where I hit a snag that halted my purchase.  I picked up my phone and called the company. A_Delivered PackThe General Manager of the company, Sam Parisette-Herzog, answered my call. He explained that they were updating the store and gladly completed my order himself. During our conversation he asked about my plans for the veneer and how I worked with veneer. He suggested that I have the veneer pressed onto a backer to make each leaf two-ply. He explained that storing and working with two-ply would be much easier, and I knew that I would not have to treat or flatten the pieces in my shop prior to pressing. I took his advice. My veneer cost $5 per square foot. I know that was expensive for veneer, but I can tell you it’s the best decision I’ve made.

My veneer arrived in a few weeks. Inside the cardboard bundle was bubble wrap and the stack was encased in black plastic. F_Cut VeneerThe leaves were stacked face to face in matching pairs with each pair labeled. (I had the leaves pressed for book match instead of a slip match – I envisioned large veneer doors with the extra leaves I ordered.) The plain mahogany backer was laid cross-grain of the veneer for additional stability. The two–ply pieces of veneer are easily cut with a sharp knife.

I’ve laid four pieces of the two-ply veneer so far and each press was a complete success. G_Veneer PressAll I do is apply glue – yellow glue of whatever kind is on sale at my woodworking store when I need to replenish my inventory – to both the two-ply back and my substrate, slip a properly sized piece of melamine over the top and add clamps. (This is where I tell you to have plenty of clamps at the ready.) I also used a couple cauls to get pressure in the middle of my glue-up.

The opening photo shows one of the panels after it came out of the clamps. Not a blemish or bubble found, and no bleed through of glue. I plan to order veneer with a backer from now on. It makes a huge difference in workability and stores so easily.

Build Something Great!

Glen

Note: I returned to veneeronline.com last week only to find that while the bundles are shown and tally sheets are available, there were no prices listed. I contacted Parisette-Herzog and was told that this is due to the website transition. Once the change is complete by mid-March, prices will be listed online.

2 Comments

Filed under Shop Tips, Veneer