
 When I returned to the shop this week, I took the clamps off the box and checked out the assembly. Things looked good, so I moved on. Step number one was to add a lid. Because I wanted to hide the lid’s appearance, I created a lip that was slightly less in thickness than the planned corner inlay. After sizing a piece of mahogany to that of the box, I used a two-step cut at the tablesaw to rabbet the piece. The lid was ready, so I glued it to the box.
 As the glue dried on the lid, I found a scrap of tiger maple and milled the corner inlay material to size. Off the saw, I ran the 3/16″ piece through my spindle sander to bring them to perfectly square (5/32″) and to clean up any nasty burnt areas. The next step was to rabbet the box for all the corner work. Because the box was square, I could simply use a straight bit set up in my router table. (If any of the edges were rounded or curved, I would have needed a bearing-guided bit.) Set-up of the bit height and fence is critical; if I rabbeted too deep the inlay I made was once again scrap. To dial in the exact setting, I used a piece of the inlay as a guide as shown above.
 When the glue was dry, it was off to the router table to trim the corners. I rabbeted only the four face corners at this time. The plan was to install the corners, then when the top edges were rabbeted, the installed pieces would be cut and the those inlays would terminate into the top edge inlay. Bring on the glue and blue tape. (I find blue tape invaluable when working with inlay.) I added a bit of glue into the rabbet, slipped in a piece of corner inlay then taped the thing in place as the glue dried.
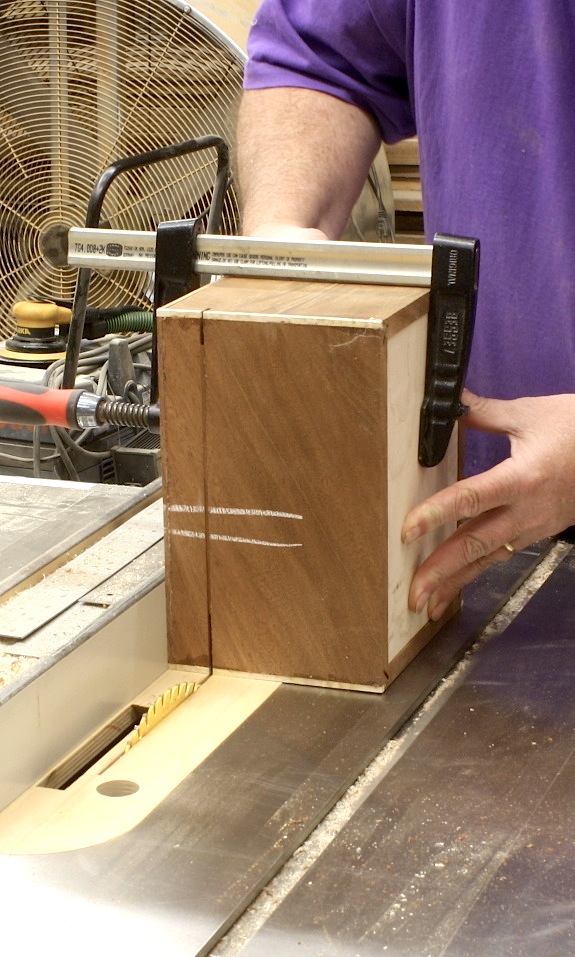 To separate the top from the box, I used my table saw. Before making any cuts, I sliced a couple filler strips that are equal to the blade’s kerf. At the saw after trimming any extra lengths of corner inlay flush with the box top, I made two passes along the front and back of the box cutting through its walls. The filler strips were slipped into those cuts, I then added a clamp to keep the top and base in place as the next set of cuts freed the two sections. You can see the operation at the right, but you might also notice that I positioned my clamp in the wrong orientation. I could easily make the first end cut, but I had to add a clamp then remove the first clamp in order to make the second cut. (If I had just moved the clamp, the sections would not have moved, but the filler strips could have fell out causing more work.)
 Once the top was off, I returned to the router set-up to run the rabbets for the four top edges and fit corner inlay to the cuts. These pieces required miters at the corners. I used my bench hook and my Dozuki saw to make the small miters. Once cut and fit, it’s back to the glue and blue tape. As the glue on the box top dried, I milled and installed bands around the base of the box – these piece were the same thickness as the corner inlay. I also fit and installed a band around the top edge of the box – these pieces were half the thickness of the corner inlay and a second band was applied to the bottom edge of the top. (When the box was joined and closed, the total thickness of the middle banding would equal that of the corner inlay thickness.) Each of these pieces were mitered at the corners. Everything was set aside to fully dry.
What’s left are the three fan inlays and to sand and finish the box. Oh yeah. I need hardware and a handle, too. Got to get creative for that.
Build Something Great!
Glen

 It’s easy to use, I can set up the miter gauge to be square and once the blade is set to 45°, I can use the same setup for two operations. The photo (at right) shows the setup used to bevel the ends. A sacrificial fence with a cut ran through it after the blade was beveled, makes it easy to locate the box parts to trim. I also added a stop-block to keep the parts from creeping away from the blade as the cut is made. One additional point you should glean from this image is my hand placement. My first inclination was to grab the gauge with my right hand and hold the part with my left. If that happened, my left arm would – at some point in the cut – completely block the blade from my view. That’s not good.
 Using the same table-saw setup but placing the gauge on the opposite side of the saw blade, makes the next step cake. Once again, make a pass over the blade to establish where the cut hits the sacrificial fence to use to align the parts, then position one piece to that kerf. Make sure to dial back the blade height, then clamp a stop-block in position to use as a guide for each cut. Notice how I switched my hand placement for this round of cuts.
 To rabbet the edges to fit into the roughly 1/4″-wide grooves, I use a two-step method at my table saw – what can’t you do with this machine? The process is straightforward. After you get the necessary measurements from the box parts – you can measure the width and length right in the grooves of the front and end – cut the bottom to size (you may want to go a bit less in width to accommodate for any seasonal movement if your box is on the wide side. The first pass is with the bottom face down against the table top – set the blade height to leave a 1/4″ of material after the cut. I make a 3/8″-wide rabbet to make sure the edge doesn’t interfere with the box as it goes together. The next step is to readjust the blade height to just tick the top edge of the previous cut (with the part standing on edge at the fence), and to set the fence to leave the tongue thick enough to slide into the groove. While it doesn’t make much of a difference here, it’s good practice to run the end-grain cuts first.


 In an earlier post about the walnut secretary, I wrote about


 If you’re using 3/4″-thick material, after the 1/8″ groove you have 5/8″ of thickness remaining. For me this is a bit of work completed at the router table. Set the height of the bit then adjust the fence so its aligned with the router bit exactly at the table’s top edge. This takes advantage of the entire thickness of your blade – if you’re slightly thinner after your cut, that’s OK, but do not leave a flat on the edge of the dovetail. (Notice the solid push block used to guide the tall drawer divider through the cut.) After you have the dovetail ends created, cut away the back edge leaving a 1″-wide dovetail – trim the dovetail away flush with the square shoulder on your blade.
 It’s time to define the socket. This is where your ability to saw comes into play. Cut the two sides of your layout down to the inch mark. Follow both lines as you saw. After you’ve established the socket’s outer edges, make a few additional saw cuts between the lines – the more kerfs you have, the easier the next couple steps become and the cleaner your socket will be to work.
 You can jam a chisel into the slots, or if they’re thin enough, you can break the pieces out with your fingers. The neat things is that when they break – due to the grain orientation – the slivers break flush with the bottom edge of the socket. (Sometimes they do break slightly above the line.) With the pieces out of the way, pare the socket bottom so it’s smooth and level. Make sure the socket is level from outside to inside. And it wouldn’t hurt to slope a bit toward the inside – that guarantees you’ll have a tight fit on the exterior of your case.
 If you’ve sawn to the layout lines and trimmed the socket even at the bottom, your blades should fit easily. Brush glue onto the dovetail and into the socket (the best glue surface is the flat-grain to flat-grain connection at the bottom of the socket), then drive the workpiece home. By the way, don’t forget to repeat these steps twice for each drawer blade or divider. Test-fits are terrible with only one socket cut.
