Category Archives: Tall Clock

Tall Clock Fast Finish

IMG_1874If you’ve followed this blog for anytime at all, you know I’ve been working on two tall case clocks. I’m happy to say that one of the clocks is done. Mine! Why is the clock I built for me complete and the other for a customer not yet finished? The answer is two-fold.

If you watched any of the episodes of the New Yankee Workshop, Norm always built a prototype. Even though I was building two clock simultaneously, I worked out the details on  the clock I was building for myself before moving to the customer’s clock. (Believe me, there were quite a few adjustments along the way.) As a result, their clock is much better. I experimented on inlay, door design and most recently on how to best position the hood door; it took two attempts to get the location right.

The second reason my clock is complete while the customers languishes on is due to the clock dial pan. Many of these antique clocks had hand-painted dials. We’d talked about the dial many times, but it wasn’t until recently that final decisions were made as to what would be painted. With a decision made and the painter contacted, the customer’s dial should be completed in November. Step_1I, on the other hand, have not yet determined what I’d like to have painted on my dial. So how did I get my clock finished? I cheated.

I visited an antique clock dealer’s web site, selected a clock that I liked, checked that the dealer had shown a front-on view of the painted dial (where the red arrow points), then copied the dial into my computer. You can see the page at the right. (If you click on any of the photos, they will enlarge for a better view.)

Step_2Once the dial was loaded, I went in and stripped the interior of the image out using PhotoShop – I’m not overly experienced with this program, but I squeeze by. I pulled the interior out because I have a movement complete with hands that I want to use, so there was no need for the hands. Also, don’t have a sweep second hand (the miniature dial just below the XII) although those are very cool in antique clocks. Lastly, I didn’t want my clock signed by Aaron Willard from Boston (not that I wouldn’t be thrilled to own such a clock). With those steps complete, I manipulated the image to match the dial pan size and hit the print button.

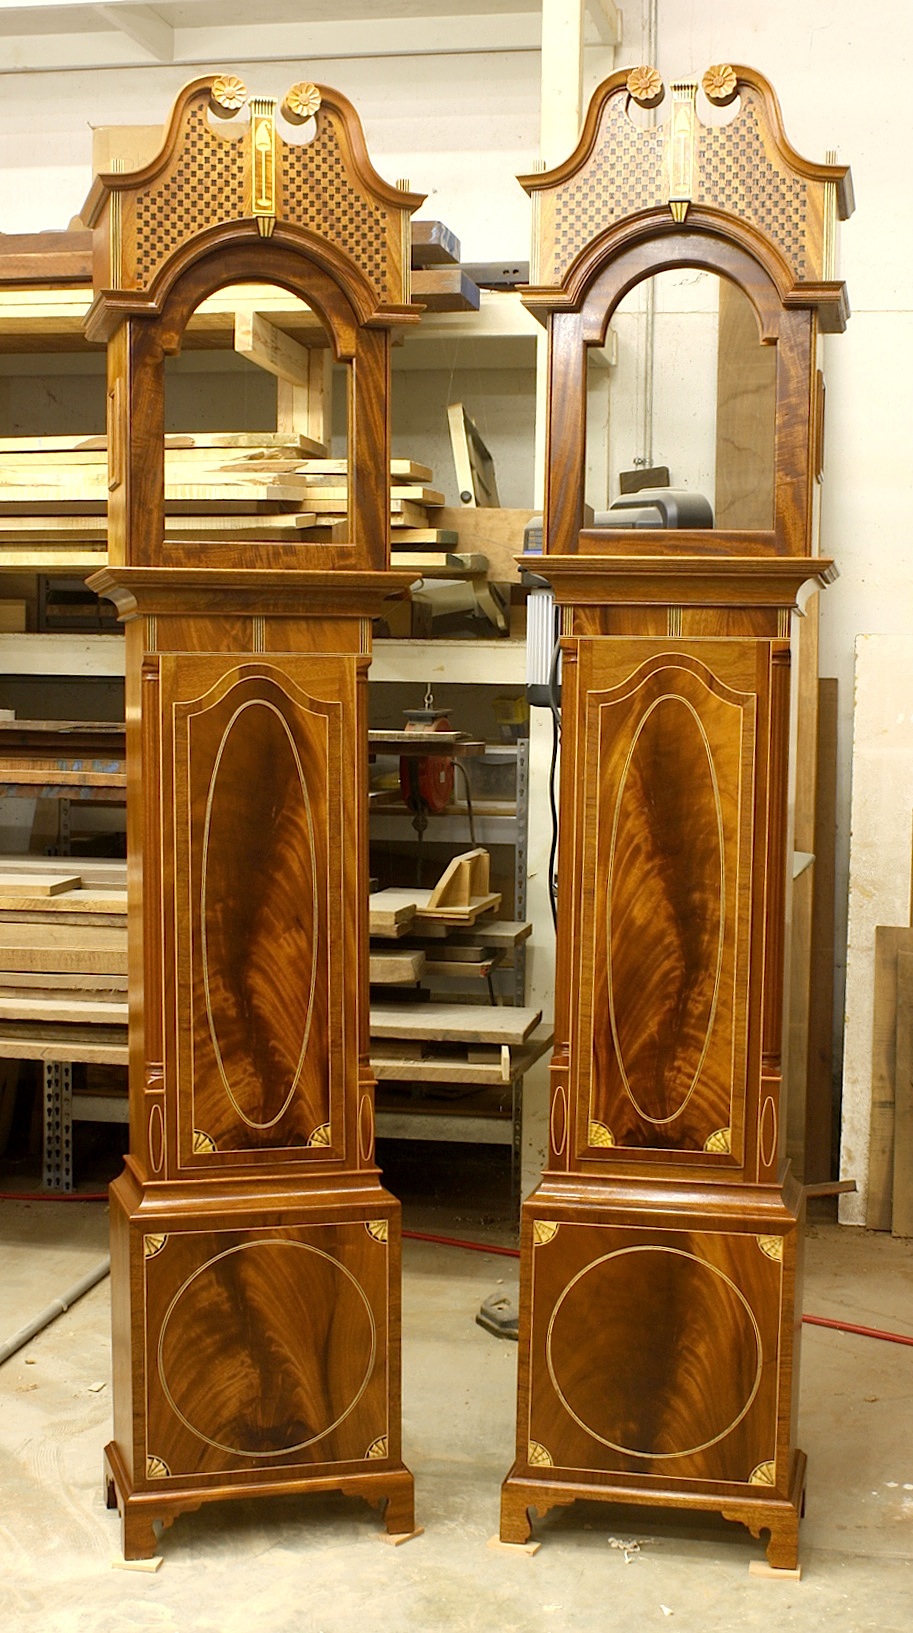
And in case you think I’m pulling one over on you, below is a photo of my clock with the hood off. When I figure out the painting for the dial, I’ll make the change. But until then my paper cheat is going to work fine.

Build Something Great!

Glen

IMG_1875

4 Comments

Filed under Tall Clock

Confidence is Key

Cherry Highboy copyA show about stained glass made my dovetails better. Yes, it’s true. I’ve told the story many times, but I don’t recall if I’ve written it in this blog. Here’s the abbreviated version. I was deep into watching a TV show about stained glass. As I watched, I was amazed at how easy stained-glass makers cut and broke the glass they used. Grab a good-quality glass cutter, etch the outline of what they wanted then snap the piece free right at the line no matter what its shape. They had confidence.

The next day while in my shop facing a stack of 11 drawers for a high chest of drawers ready to dovetail (shown above), I decided that I too should have the confidence to cut dovetails better and quicker; I had to find and use that confidence. That day I completed all 11 drawers and they were the best dovetails that I had ever cut. Confidence is the key.

IMG_1842Since that day, I have had confidence in cutting glass as well. I know it’s going to snap at the etched line. That’s what it’s suppose to do. Yesterday, I put my confidence to the test. I cut the glass to fit the tombstone design on the Egerton hood doors. Plus, to make the job even more challenging, I used reproduction glass that has waves and imperfections in the glass.

Adj_Door copyThere is a key to making this work. The secret is in the door. Take a look at the backside of the door (you can see it better in the inset photo). If you look close, you’ll see how the corners of the frame are rounded. Years ago I tried to keep those corners square – that was almost an automatic failure when cutting this design for a door. (I did have a glass expert cut a panel for the first hood door I built and he used a sander to square the corner.)

IMG_1846To get the glass cut to fit, I begin with a panel that’s sized to fit the width and is cut to the final length but without the tombstone cut. Next, lay the rectangular sheet into the door frame with its bottom edge in the frame and the top section riding just above the arched portion of the door. From there, take a permanent marker and trace the design of the tombstone door onto the piece of glass; complete both halves (the apex of the arch should terminate at the top edge of the cut glass panel.

IMG_1848Now it’s time to make the cut. As I score the glass, I listen to make sure the cutter is etching the glass. If you do not hear the etching noise, you’re not going to make this work. With the glass scored, it’s time to put to use that ball shape that’s on the non-business end of the cutter – before I began cutting glass, I wondered what that ball was for. To snap the glass, hold the corner firmly with a slight downward pressure then tap the underside using the ball end. If you watch closely, you can see the etch turn into a break right at the scored line. Be patient, but have confidence.

IMG_1849In a short amount of time, the piece snaps off and you’re left with half of the tombstone top cut. The first half is the easiest because if you don’t complete the job, you begin again. The second cut is when you need to summon all your confidence. If the second cut breaks in a less-than-acceptable location, you toss the panel and the completion of the first half. But with your confidence at an all time high due to the adrenaline pumping through your body with the first half cut, you cut and snap the second half in no time. All that’s left is to make sure the piece fits the door. (I had to nip a small piece off the second piece of tombstone glass cut for door #2.)

IMG_1850

I have two small square pieces of glass that also fit into the hood. After the tombstone cuts, square cuts are a snap. That’s glass-cutting humor.

Build Something Great!

Glen

4 Comments

Filed under Methods of Work, Tall Clock

No Day to Spray

AntiqueBackWhen I got up on Saturday morning, I knew there was a huge possibility that in the shop I wouldn’t be doing what I planned. I was going in to spray the final coat of shellac onto my clocks; I’m looking to darken the overall appearance just a shade more. The humidity was high which means that there was a chance for the finish to blush, or turn cottony white with moisture trapped in the finish.

Instead, I decided to work on the backboards for the two clocks. On most antique clocks, the backs run top to bottom and are not attached to the hoods, so the hood can be removed. The stacked series of three photos at the left show a typical clock back (click on the image to make it bigger).

Generally you see a main board that runs the full length with ears attached at the base and hood areas. That requires a board or panel that’s 90″ in length and 15″ wide. I could have done that – may due it if John and Joe (brothers for which I’m building this clock) want to go with the antique design.

The second clock, however, is for me (at least at this time), so I’m going at it differently. IMG_1767I’m running the boards across the back from the bottom up about 50″ just as would be seen on a case piece of furniture. I then plan to turn the upper board so its grain runs vertical. To make the transition, I’m using a tongue-and-groove joint. It’s a bit more work and will need a few additional fasteners (nails I suspect), but I can use short pieces of scrap cut off from other projects. Frugal, huh!

To make this happen, I first added a shiplap cut to each of the milled, over-long, random-width boards selected for the back. IMG_1768I began at the bottom – the bottom board was cut on only one edge. From there to the 50″ mark (it doesn’t have to be that length, it’s just what I chose based on the number of pieces I had to use and the width of those pieces), I fit and positioned each board. The top board – also shiplapped on one edge – was taken back to the tablesaw for the tongue portion of the transition joint. I then slipped the top horizontal board in place and added a couple of clamps to hold things secure.

IMG_1771I had to get the final length measurement of the vertical board, so I had to stand the case upright and add the hood. With that measurement in hand, I cut the groove portion along the bottom edge of the panel, and laid out the exact spot where the back needed to step out to fill in the extra width of the hood.

Because the glued-up panel had set in the shop for some time,there was a small amount of warp I had to deal with. Here’s a great shop tip: To straighten out the panel, I clamped a straight piece of stock across the panel width keeping the clamps above the height of my saw fence, then made the cuts needed to form the groove.

The ears were cut at my band saw, then trimmed to length at the bench using my handsaw. To final check and tweak the fit, I joined the tongue and groove, then slide the assembly into position. Below you can see how the transition works. Because the top panel extends down the clock’s case, there are more than enough places for fasteners. This setup should work great.

Build Something Great!

Glen

IMG_1775

1 Comment

Filed under Design, Joinery, Methods of Work, Shop Tips, Tall Clock

Hood-door Hinges

IMG_1746When you think about hinges for furniture, you probably think about regular hinges with two leaves that are screwed to a door and to the case or face frame. That’s not the case with many hood doors on tall case clocks. The opening photo shows two pairs of hood-door hinges. No knuckles. Just a flat piece of brass cutout in a funny shape. These hinges are different.

HortonI picked up my hinges from Londonderry Brass ($15.50 each). These hinges have a nice antique look about them, but there are a few problems with which to deal. Horton Brasses’ hood-door hinges ($10.00 each) are less antique looking, but do away with some of the problems. (My third primary hardware supplier, Whitechapel LTD., didn’t have the hinges or I was unable to track them down on the web site.)

If you look at the photo above, you get an idea as to what the problem is with the hinges. The company sends out hinges that are all the same. Unfortunately, you need matched pairs. Also, the holes in the hinges are too small for appropriate screws. The first order of business for me was to align the hinge plates into pairs, enlarge the holes and make countersinks for the heads. (I marked the face that needed the countersinks.) The work is easy because the brass is soft, but due to the odd hole locations presented with the antique look, the enlarged holes get dangerously close to the outer edges of the hinge. If I could get these hinges without holes and countersinks, I think I’d be better off. In fact, if I had the time (and inclination to do so), I may try cutting my own from a piece of sheet brass.

IMG_1757How these hinges fit is also different. The work to set the hinge is all in end grain – the top and bottom end of the hood-door stile. As you locate the hinge, you need to watch the edge of the door stile. A strong rap with your mallet and the chisel can easily break the grain along the edge of the door. That’s not good or fun, so work with a knife or cutting gauge and leave the whacks for dovetails. And you better sharpen your chisels before you begin. Of course, you know what it’s like to pare across end-grain.

IMG_1761After you get the hinges set into the door stile – one at the top and a second at the bottom – the screws are installed. Because I’m merely fitting these at this time (I have more finish work to do), I installed only two screws per hinge. A bird-cage awl is the perfect tool to start these screws. Here you can see where having the holes too close to the edge of the hinge can be problematic. In early builds, I’ve split the stile as I’ve driven home the screws. Make sure you properly drill the holes, especially at the outer edge.

IMG_1762With the hinges installed, how things work is rather simple. The part of the hinge that extends out from the door is secured to the hood with a screw through the hole. Originally, that was probably done with pins, but I think a screw is a better choice in case you need to pull the door for any reason, such as to replace the glass. This method also allows you to align the door in the opening. Set the door at the bottom then as you install the top screw you can make slight adjustments to get the reveal just right.

And here’s a tip when working with hardware that shows more handwork. Mark the individual hinges so you can get them back in the same place. I learned this lesson the hard way when I built my first step-back cupboard using rat-tail hinges. As I we back to re-install the hardware, I spent too many extra hours trying to fit the parts into the proper position – all leaves are not the same, and the screw holes are not matched. Sharpie to the rescue.

Build Something Great!
Glen

IMG_1763

Leave a comment

Filed under Hardware, Shop Tips, Tall Clock

Egerton Clocks & Shellac

IMG_1651 2I’ve learned a great deal  as I progressed through the school of hard knocks to become a professional woodworker. What keeps me involved in writing this blog, magazine articles and teaching, and why you should take advantage of my experience, is the fact that as a professional woodworker, I can help you more easily learn woodworking so you don’t have to pay all of your dues. You get to walk through a few doors instead of having to break them down.

Some of the things I learned are general knowledge, such as a highboy base is not the same as a lowboy even though they appear to be the same – I remember how struck I was when I first discovered that. And some things can be applied to every project; or not. As I began to apply shellac to the tall clock, I was again smacked with the idea that all the parts for your project should come from the same tree, if possible. While that’s not always possible, it is a great concept and should be in your mind as you set about a new build. Why? Mostly due to aesthetics.

TonerOn these two clocks, the mahogany was from many sources, especially the veneered base and door fronts. I found that I needed to adjust the tones and colors. As a result, finishing without using dyes or stains becomes a bit more important. TranstintIn an earlier post about the walnut secretary, I wrote about adjusting the finish using toners. Toners, in aerosol cans, are tinted lacquer. In use the lacquer becomes layered between coats of shellac forming distinct divisions in the finish. This time, I stuck with shellac, but added drops of Transtint dye to introduce color. Shellac melts into shellac, so the finish developed is one harmonious layer. Is this better than toners? On that I’m still trying to decide, but it’s nice to have choices.

SAMSUNGAfter I had adjusted the colors to where I think the tones were even, I applied a layer of amber shellac. Of course, I didn’t have any in the shop, so I shuffled off to the local hardware store to pick up a quart. Surprise. The store had six quarts on the shelf, but of the six quarts, not one was usable. Not only were the quarts outdated, most were from 2007. (sorry for the blurry photo, but I had to show the grouping.) If you’re a regular reader of this blog, you know my thoughts on shellac, and you by now know how to make sure shellac is worthy of a purchase. (If you’re not sure, search this blog for information.)

SAMSUNGThe shocking revelation was that these cans were so old they were marked using the older Zinnser system of dates instead of a code. And the dates was printed on the bottom of the can, which if I remember correctly, was a full generation earlier (prior to the code, dates were marked on the lid.) A word of caution: Check the shellac cans and dates prior to any purchase and choose shellac that is less than three years old.

Build Something Great!

Glen

4 Comments

Filed under Finish Techniques, Methods of Work, Tall Clock

Finish Ready

IMG_1511This is a day long coming. My Egerton tall clocks are ready to begin the finishing process; I’ve completed the work and sanded each clock to #180 grit. As you may have guessed, there is no dye or stain going on the clocks – that would mask the contrast between the mahogany and the inlay. Step one is an application of boiled linseed oil which should produce an unbelievable look.

There is a lot of real estate on these clocks, so brushing on the oil may take some time. (I’ve never sprayed boiled linseed oil, but there is always a first time.) It’s after the coat of oil when I see how the clock should look when finished. Of course, with shellac, even clear shellac, things will get a slightly darker.

You may have noticed that the reeded columns are not attached to the hoods. This is on purpose. Columns fit to the hood in the brass capitals. If I had attached the columns, all my finished would have been over the brass – not a good idea. Each column will be finished independently, and installed afterward. Same with the glass in the hood doors.

The crowning touch are the brass finials that fit at each front hood corner, as well as the center of the hood between the carved rosettes and above the inlaid nightcap.

I’ll share a photo of the clocks when the finish is complete.

Build Something Great!

Glen

16 Comments

Filed under Finish Techniques, Tall Clock

Door Frame Fix

When I began building the Egerton tall clock, I built one base, waist and door before deciding to build a second clock. As I completed the door on the second clock, I moved to the hoods without fitting the door to its opening. Mistake. Big mistake.

Nearing completion of the two clocks, the time arrived to fit the door. No worries. I setup my router with a rabbeting bit, IMG_1501ran the bottom, left side and top, leaving the right side for the hinges – that side has only an 1/8″ rabbet. I carried the door to the case, but it didn’t fit. The arch at the door’s top wouldn’t fit into the opening when the balance of the door was in place. I remembered that the arch pattern I used was off center – a design feature specifically chosen to keep the arch centered in the waist when rabbeted to fit. If I would have made the rabbet cuts so the door hinged on the left side instead of the right, my work would have been done. Crap.

After thinking about possible fixes for the week, yesterday I headed to the shop with a plan: Cut away the current piece from the door frame, then install a new section that was cut to fit and laid out using the door itself. To attach the new piece, I had a long-grain connection at the top edge. The ends, however, needed something for hold. I decided a half-lap at each end would be perfect.

To make this happen, I setup my router and grabbed a piece of plywood scrap that IMG_1502had a perfect 90° corner intact. The distance from the edge of the router’s base and the far edge of the straight bit I loaded was found. I then added another 1/2″ to allow for the half-lapped ledge. I positioned the makeshift, plywood fence that distance from where the rail and stile met on the door frame and was ready to cut.

I set the depth of cut to just remove the entire thickness of the rail, and made the cut. IMG_1505The fence was then reversed to work on the other side where I followed the same process. With those two cuts made, I adjusted the depth of cut so half the total thickness of the rail was removed, positioned the fence so the router bit cut exactly at the rail/stile intersection and trimmed away the material as shown in the left-hand photo. The center section was simply free-hand cut once the fence was removed. All that was left to waste away was the top edge.

I set the fence in place to work the same magic along the top edge, then made a shallow test cut so I could dial-in the exact setting. IMG_1506It took a couple of tweaks because I wanted to remove the rail without cutting away any of the tri-colored stringing just above. Once I had the fence just where I wanted it, I adjusted the bit depth and made the last pass. As I reached the end of the cut, the old rail fell away. Perfect. I grabbed a chisel to clean up the corners and square any rounded portions left from the router bit. Time to fit a replacement.

I spent a little time getting the new rail sized and tightly fit to the existing framework. The ends of the new rail were easily rabbeted using my table saw. IMG_1509With the replacement in position, I put the door in place then drew a pencil line around the rabbeted arch of the door. The rail was pulled from the clock waist, a cut at the pencil line was made using my band saw, the raw edge was sanded at my spindle sander and the replacement was then glued into position. The long-grain edges mated up and the half-laps worked great. When the glue was dry, I sanded the surfaces flush and called it done. Everything went according to plan and much quicker than expected. I call that a great day in the shop.

Build Something Great!

Glen

3 Comments

Filed under Jigs, Power Tools, Routers, Tall Clock

More Uses for Handscrews

IMG_1459This week I worked on the hood details of my tall clocks – the plinths for brass finials. The parts are small. As I worked, I discovered that my handscrew clamps were often drawn into action. These clamps are a great way to hold small parts.

The center plinth had to be shaped with a small radius cut at the front and sides. The first use of the handscrew was to hold the two (one of each clock) plinths face to face so I could easily drill the front radius; one 3/8″ forestner bit cut and created a small 3/16″ radius. I then went to my spindle sander to form a similar radius on each of the two sides of the plinth.

IMG_1462After the radius was created, I had to remove the material left below and sanding away that amount was too time-consuming. Band saw, here I come. At the saw, I wasn’t going to hold the plinth with my hand. Handscrew to the rescue. With the small part locked in the clamp, it was easy to trim the waste.

Two more uses for what should be a staple in the shop. And I find old clamps best, so shop auctions in you’re looking to add handscrews to your selection.

The hood (shown below) is coming along great. I now need to begin final sanding and finish. Below is a look at the hood without the brass finials. I need to get those ordered. At $70 each, I’m not in a big rush.

IMG_1464

Build Something Great!

Glen D. Huey

5 Comments

Filed under Methods of Work, Tall Clock

Reeded Column Round-up

IMG_1455I’ve reached the ends of the reeded columns for my tall clock. Literally. The last step is to round the ends of each reed. I thought I might be able to speed this process along using a lathe to round the ends in one fell swoop, then just touch them with my carving gouge. That, however, was a waste of time – and one good column. Spinning the column at the lathe again meant that I needed to locate the centers, load the workpiece accurately and have it spin dead-on. Looking back, I should have known it wasn’t going to work. But sometimes I’m pig-headed and have to prove myself wrong before I turn to other methods. Boy was I proved wrong.

I then turned to my carving tools. There are eight column, each with 12 reeds. That’s a whopping 192 reeds that needed round ends. (That’s why I was looking for a speedier solution.) I matched the reed shape to my closest-sized carving gouge, which turned out to be a #9, 5mm tool.

The process is easy once you get started. The gouge is inverted on a reed, set close to the end then pivoted upward as the cut is made. It takes a couple of passes to get the end shaped as needed, and to keep the ends aligned with one another. The series of photos below show the actual movement. The opening photo shows three completed reeds.

IMG_1449IMG_1450IMG_1451IMG_1452

Of course, there was more work to do. Each of the reeds needed to be worked a little for a better rounded shape. (I should have set the scratch beader a bit deeper, but hindsight is, well you know.) Each end was shaped and each reed has been sanded smooth. I should wrap up the hood work this week. A few inlaid blocks is all that’s left. We’ll see.

Build Something Great!
Glen

Leave a comment

Filed under Hand Tools, Methods of Work, Tall Clock

Bump-cut Band Saw Tenons

IMG_1439Because I had to make the columns on my tall clocks longer than needed so I could form the reeds with my scratch stock, each column needed to be cut to length. (The blue tape held together a fracture at the end of the column – I use this same technique when turning, if need be.) Once at length, each end of the columns needed to be reduced in diameter to fit into the brass capitals. Then ends of the individual reeds are then shaped further.

My first thought was to load a column at my lathe and turn the tenon before I cut the pieces to length. I want a snug fit through the capital, and there would be no way to check the fit while on the lathe – there was about 2″ to remove off each end of the columns, so I couldn’t simply slide on the capital. IMG_1440If I cut the lengths first, I lost the center markings and, for me, that makes loading the piece on the lathe too much of a hassle (I’ve not had success remarking the center whether using a center-marking gauge or not).

What I decided to do was to cut the columns to length, then use my band saw to form the tenons – it’s a similar operation as making a bump-cut tenon using a table saw. (You can see a short video of this technique here.) In the photo above right, you see the end of the columns after its been cut to length. (You can also see that there is more work to do on the reeds.) And below you can see my setup at the band saw.

IMG_1443

I used a bench hook to guide the stock, and used a spacer (set between the hook and band saw table) to locate the hook fence just beyond the blade. This setup is somewhat critical. If you’re too far beyond the blade, you will remove too much material. (If you’re in front of the blade, your tenon would be too fat.) I say that setup is somewhat critical because you do have a little adjustment. IMG_1445That comes from moving the band saw blade forward or back using the guide bearings on the saw. A simple tweak can push the blade forward to allow you to dial in the best cut. I went for a tenon that was just too snug to fit my capital so I could lightly sand the tenon to fit. The photo shows a closer view of the setup. (Click on the photo to see it even larger.)

I positioned the column tight to the second block – that piece has a 1/2″ notch which is the tenon length, and I’ve clamped it tight against the bench hook to make sure the two are aligned. With the column set against the second block, I spun the stock to cut the tenon shoulder. I then nibbled away the waste in one area of the tenon – it takes a bit of wiggle and movement. Once that area is flat and clean, I began the bump-cut technique. IMG_1446Back and forth into the second block while rotating the column; it’s like rubbing your head as  you pat your stomach.

When a full rotation is finished the tenon is formed. Two clocks, four columns per clock and two ends per column left me with 16 tenons to form. Taking the time to set up this method saved me time in the long run. And I didn’t waste a column that needed to be replaced with another – that would have burnt at least an hour of shop time.

Build Something Great,

Glen

Leave a comment

Filed under Jigs, Power Tools, Shop Tips, Tall Clock