Tag Archives: boiled linseed oil

Best Tool for the Job

Something that I preach is that we woodworkers should use the best tool for the job. It that’s a table saw, jointer or big-honkin router, so be it. It the best tool is a handplane, egg-beater drill or sharp chisel, go for it. Mitersaw_cutTo be wholly dedicated to one woodworking discipline while ruling out others is nuts.
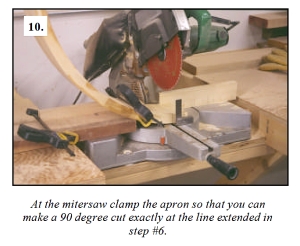
The story I like to tell is a tale on myself. When I built the Baltimore Card Table article for Popular Woodworking Magazine, I was more dedicated to power tools even though I used hand tools. In one of the early steps of the build, I needed to trim the ends of the brick-laid apron. I spent 20 minutes or more setting up the cut at my miter saw. Of course, the cut was square and right. (See the image from the article above.)

Years later, after hand tools began to play a bigger role in my day-to-day woodworking, I taught how to build that table at a woodworking school. When the time came to trim the apron, I grabbed my pencil and square, laid in the lines then made the cut using a hand saw. Of course, the cut was square and right. The difference was that I did not spend 20 minutes setting up the cut.

What’s important is to choose and use the best tool for the job.

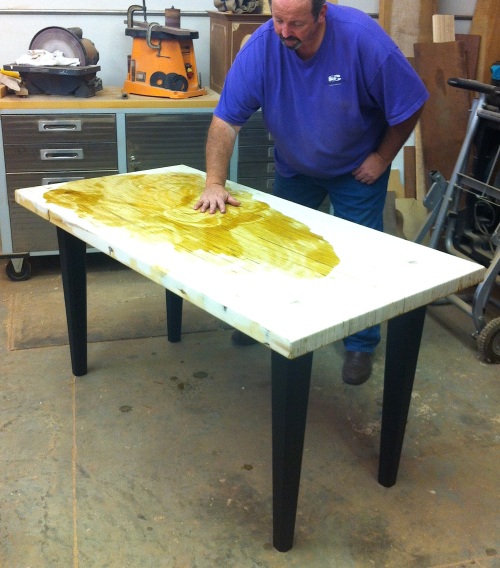
In the photo below, I guess the tool would be classified as a hand tool. I  know, however, that it is the best tool for the job. Why? No only does this tool make spreading the oil/varnish mix quick to accomplish and easier to direct finish were it’s needed, the process also warms the oil ever so slightly to better allow mixture to soak into the surface.

OV_LVL_1

Build Something Great!

Glen

8 Comments

Filed under Finish Techniques, Methods of Work, Shop Tips, Shop Tool

Inlaid Box #4

IMG_1752I’m sure you’ve heard the saying “never send a boy to do a man’s job.” That holds true for magnets, too. After hinges were added to the inlaid box, I drilled and installed two rare-earth magnets to hold the lid closed. Working in only 1/2″-thick material, I decided to use smaller-diameter magnets. After drilling the first hole and wanting the two magnets to line up, I used a 23-gauge pin as a center finder to mark the lid location for the second magnet – it worked like a charm. I epoxied the magnets in place and went home for the day.

CombinedA

The next day, I dropped by the shop on my way to work just to check my magnetic lid setup. The magnets looked great. They were perfectly aligned. There was not enough pull, however, to hold the lid closed. Crap! Now I’d have to pull those magnets, repair the box and lid from the destruction of pulling the magnets and come up with another option to hold the damn lid closed. I thought about it for a couple days then decided to stay with the magnets, but increase the size. Go big or go home, I guess.

IMG_1747With the repairs made and the two magnets holding strong, I was ready to apply a finish, so I mixed up a little oil/varnish finish for the box. I’ve used this finish on many pieces of furniture, including a Shaker sewing desk and a Seymour marble-top sideboard. It’s easy to make and easier to use.

Mix 1/3 boiled linseed oil, 1/3 spar varnish (spar adds a bit of elasticity to the finish) and 1/3 turpentine (I’m told you can use mineral spirits as well, but I’ve never done so). That’s it. For larger jobs, I mix enough for 1-1/2 coats, then eliminate the turpentine (50/50 varnish and oil) as I add to the mixture. The turpentine simply thins the mixture so it can soak into the grain; you only need this on the first coat.

Finish

Brush the mixture onto the project and keep everything wet for about 5 minutes so the finish gets deep inside the wood pores. After five minutes, wipe away the excess. If there’s no excess, you didn’t apply enough finish. Let the project sit until the finish is dry, then apply another coat. On later coats, because the finish is only oil and varnish, you need to let things sit until the mixture feels like honey before wiping off excess. And if you missed a spot when wiping things clean or if you have a rough texture in the dried finish, take #320-grit sandpaper and sand the surface smooth.

The opening photo shows the box with its first finish coat applied. It takes three coats to build a protective finish, four coats starts to build a sheen and with each additional coat, the surface becomes even more shiny. Like I said, easy.

Build Something Great!

Glen

5 Comments

Filed under Finish Techniques

Finish Ready

IMG_1511This is a day long coming. My Egerton tall clocks are ready to begin the finishing process; I’ve completed the work and sanded each clock to #180 grit. As you may have guessed, there is no dye or stain going on the clocks – that would mask the contrast between the mahogany and the inlay. Step one is an application of boiled linseed oil which should produce an unbelievable look.

There is a lot of real estate on these clocks, so brushing on the oil may take some time. (I’ve never sprayed boiled linseed oil, but there is always a first time.) It’s after the coat of oil when I see how the clock should look when finished. Of course, with shellac, even clear shellac, things will get a slightly darker.

You may have noticed that the reeded columns are not attached to the hoods. This is on purpose. Columns fit to the hood in the brass capitals. If I had attached the columns, all my finished would have been over the brass – not a good idea. Each column will be finished independently, and installed afterward. Same with the glass in the hood doors.

The crowning touch are the brass finials that fit at each front hood corner, as well as the center of the hood between the carved rosettes and above the inlaid nightcap.

I’ll share a photo of the clocks when the finish is complete.

Build Something Great!

Glen

16 Comments

Filed under Finish Techniques, Tall Clock

More on a Punched Scroll-board

IMG_1113I’ve been leery of the Egerton tall clock punched scroll-board veneer from the git-go. Until this weekend my concerns were in how to attach the  veneer – backed by what appears to be speaker cloth – over the scroll-board. If I glue the speaker cloth over the holes drilled into the scroll – holes that are to allow more bell sound to emit as the movement strikes on the hour – I’m sure to get glue on the cloth. That’s not going to work. Also, as I then glue the veneered face to the assembly, once again glue seeps into the cloth and the mess continues.

This weekend I found a new concern. How would I finish the clock if I worked out all the attachment issues? There will be no dye or stain, but I will add a layer of boiled linseed oil to highlight the grain in my mahogany. IMG_1109And with shellac as my topcoat, how the hell would I brush, wipe or spray shellac without filling the open weave of the speaker cloth? I’m at a loss and turning to plan B. Or is that E? Not sure.

The next plan was to attach my punched veneer directly over the scroll-board without using a cloth between. To glue the face veneer to the scroll would be easy, but the holes would be a problem. Some of the holes do not go all the way through the scroll and the look in a mocked-up sample was less than stellar. I used a brad-point bit to cut my holes. The center point of the bit left a nasty look in any holes not drilled completely through. IMG_1108Maybe a spoon bit and a brace? Too much work. A round-nose router bit plunged into the scroll? Too much rigging, With another quick look at that arrangement, I knew it was out. Next idea, please.

My mind scrambled for an answer. How about black veneer behind the punched-out face veneer? Finishing would be OK. Oil and shellac would work fine on top of the veneer. The look would be similar. Where was the problem? (There had to be one, right.) Sound. That’s it. The idea of the cloth and holes was to elevate the sound of the bell ring. No holes equals less sound. It’s OK to not have holes in the scroll-board. Most clocks don’t and the sound of the chime is still heard. I moved forward.

IMG_1110Black-dyed veneer was cut and fit to the punched face veneer. A thin layer of glue was spread and the two veneers were sandwiched between wax paper and two make-shift platens. Clamps held everything flat as I waited to see my results.

As the glue dried and I worked on other areas of the clocks, Dave Griessmann, a friend who spends time in my shop on Saturdays – he also forces me to have doughnuts in the morning and lunch at BW3 – suggested that I still place a few holes through the scroll-board to help with the sound. Good idea. I think sound would increase if it only had to pierce two thin layers of veneer. A few well-placed holes are being considered, but that decision can wait until later.

Being the visual woodworker that I am, I thumb-tacked the veneer sandwiches to the hood and stood back to take a look. That’s what you see in the opening photo (click on it to make it larger). The contrast is more now than it will be when the mahogany is colored and finished. I like it, but I need some time to decide. You have any ideas?

Build Something Great!

Glen

5 Comments

Filed under Tall Clock, Veneer