Tag Archives: Woodworking in America

Always Something to Learn

IMG_1944
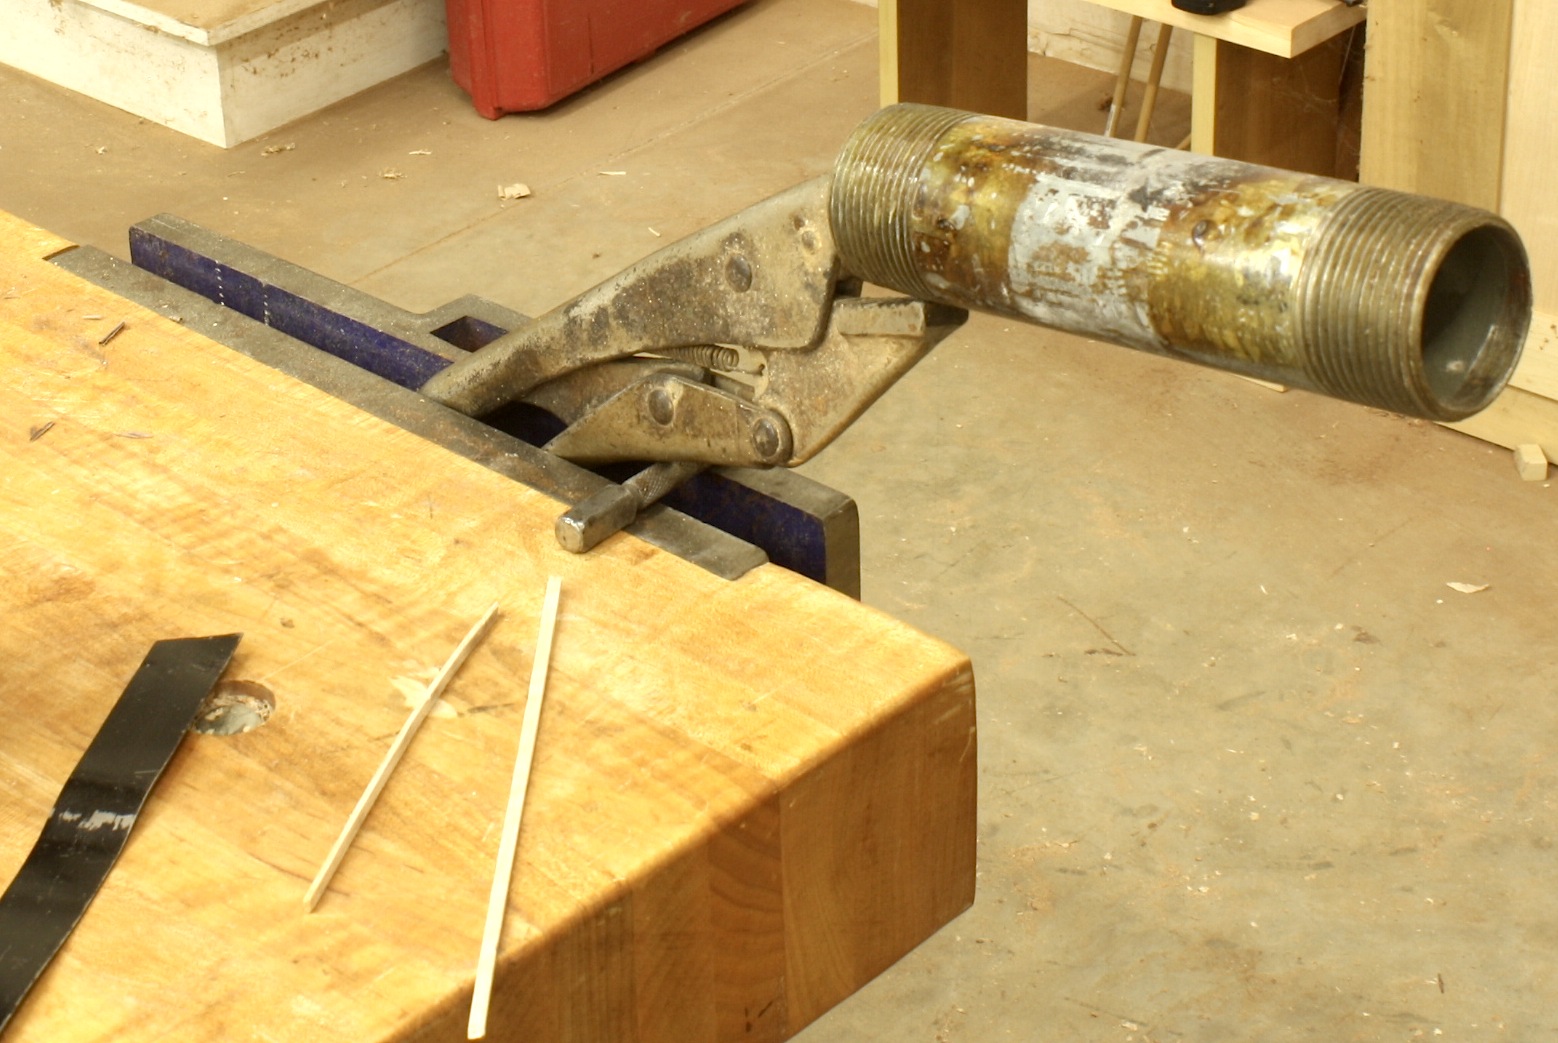
In woodworking, one of the most satisfying things is that you never know it all. Everyday there is something knew to learn. That’s one of the things that keeps me looking and listening and trying new ideas. In the left-hand photo, you see how I’ve set up to bend stringing since I first began working with the material. I grabbed a length of pipe in Vise-grips, clamped it into my bench vise, heated the pipe and bent the stringing over the pipe using a metal-strap backer. If you look close, you see a nail set slipped between the grips and vise. I sometimes found that downward pressure as the bend was taking place could cause the setup to move in the vise, and that’s not a good thing to have happen. The nail set stopped that.

As I’ve demonstrated this technique to different woodworking groups, I’ve had occasion to see a few interesting string-bending setups, including  a massive three-pipe selection that bolted to a workbench and allowed a constant flame to keep the pipe at the correct temperature for bending – whatever that is. I’ve also been asked so many times about using a heating iron as does Steve Latta; sorry Steve, that’s way too slow.

I did, however, learn a new setup while teaching my session at Woodworking in America this past weekend (the reason there was no post on this blog last Sunday). I traveled to Winston-Salem, N.C. without my Vise-grips and nail set. When it came time to demonstrate the technique, I was at a loss. Until, that is, I grabbed the F-style clamp I tossed in the conglomerate of stuff I’d taken along. With the length of pipe secure in the clamp, I set it into the bench vise with the handle resting against the top of the vise. No amount of downward force would cause the setup to move. And as long as you remove any plastic fittings from the clamp, heat from my torch was not a worry. It worked great.

IMG_1943There’s always something new to learn in woodworking.

Build Something Great!

Glen

3 Comments

Filed under Back to Basics, Inlay, Jigs, Methods of Work, Shop Tips

GDH at WIA

This week, I want to mention Woodworking in America (WIA). With my return as managing editor with Popular Woodworking Magazine (PWM), you know that I’ll be and teach at WIA. If you are a woodworker in search of basic skills, you should plan to attend. If you are experienced at woodworking, but are looking to up your game, you should plan to attend. My bet is that if you look at the woodworkers PWM has presenting this year, you’ll want to be there, too. (Registration is open, so now is the time to make the call. Pull the trigger and click here to sign-up.)

This year my classes are all over the map. I open the conference teaching a seminar titled, “Better Woodworking Through Proper Wood Prep.” MIllingThe most basic observation I can give you is that if you begin a project with warped wood, you will fight it throughout the entire project. You need to make sure you know the basics, so of course we’ll cover the basics and you can bet there is way more. I’ve spent 20 years milling wood for projects. I’ve learned a crap-load of tricks and techniques to make the work easier and to mill lumber that is bent, twisted and just plain gnarly. In addition to the basics, I’ll share how to read your stock, what corner to press and when to straighten twisted stock, cup up or cup down and what to do if your board sticks at the jointer. This one class can make your time in the shop better.

Another class I’m teaching is “Precision Joinery: In a Hurry.” In this area alone, you discover why you need to be a blended woodworker. 9The class description from WIA says it best, “No single hand tool, power tool or machine is best to produce all the requisite joints. To make parts as quickly and accurately as possible, you need to know what tool to use when.” I’ve got jigs that make my life in the shop easy and highly productive, but I also know when to turn to my hand tools. During the class we’ll look at a number of furniture joints and I’ll share my best techniques.

On Sunday at WIA, I have a three hour class on inlay based around Federal-style inlay. Be sure to attend “Understanding Inlay: A Key Piece in Connoisseurship & Identification.” InlayIf you study inlay you’ll discover that each major city center had its own distinct inlay designs. One of the most famous (and often miscategorized) banding is the lunette inlay often associated with John and Thomas Seymour in Massachusetts. Every banding, inlay and patera is a clue to where the piece was built. Not only will we learn about different inlay and bandings, but I’ll demonstrate how many of these bandings are assembled. And before the class is over, you’ll be given the opportunity to make a sand-shaded fan that you can inlay into your project. So come ready to learn and ready to work, too.

Build Something Great!

Glen

Leave a comment

Filed under Inlay, Jigs, Joinery, Routers, Uncategorized

Clock Movement Arrives

IMG_0813This past week, the movement for my Egerton Tall clock arrived from Green Lake Clock Company. Because many woodworkers do not often order clock movements, I thought it would be interesting to see photos of not only the movement and what comes in the package, but also get a look at the crate in which everything is packed.

First, the movement ordered for this clock has the dial that has a coating over the entire front and back of the dial. Generally, these dials come as bare metal, but this appears to be a base coat onto which the hand-painted surface can be added. A quick call to the company confirms that the coating is what is used if you purchase a painted and silk-screened dial. (Green Lakes ran out of bare dials, so a few orders were shipped with the primed surface.)

IMG_0814The movement itself – shown in the photo to the right – is a Kieninger Bell Strike movement which includes the top-mounted bell, cable pulleys and the gears and internal workings which are behind the back plate. The saw-like wheel that you see above the bell is the moon dial.

A moon dial rotates slowly as the clock moves throughout the day. Different scenes are painted on the moon dial to reflect the time of month. This, along with the main dial can be customized for a personal effect. A  clock that was built by the customer to which my tall clock goes, has an image of his house painted on the moon dial. Very cool.

IMG_0818Other parts of the movement – sent packed in three layers of Styrofoam – are the weights and pendulum bob which are cast iron, and a winder and a few miscellaneous parts. These are shown to the left. Also included with the package are clock hands.

Below are a couple more photos. The left-hand photo is a close-up view of the movement, and at the right is a close-up view of the rear of the moon dial. Overall, the entire package is ready to install into the clock. Now if I just had the clock ready for the movement.

IMG_0819     IMG_0816


And kudos to Green Lake for how the movement was packaged for shipment. Below you can see a corner of the crate. Notice the rabbeted sides that capture the top and bottom of the crate. And look at the dado for the mounting board. Nice, quality work. IMG_0820I am impressed. You can reach Green Lake Clock Company through the highlighted link above, you can call Mike Siemsen – company owner and instructor at the 2013 Woodworking in America conference (WIA), (read more about WIA here) – at 651-257-9166 or send snail mail to: 9912 Green Lake Trail, Chisago City, MN 55013. Oh, you can email him at mike@greenlakeclock.com.

Build Something Great!

Glen

1 Comment

Filed under Hardware, Tall Clock

Gorgeous Gams & Other 2013 Classes

I expect to have a busy 2013, so I limited my teaching weeks and weekends this year. Scheduled are only two classes that are week long, and one weekend class that begins on Friday. (Guess that would be a three day class.)

LegOnce again, Bob Van Dyke has invited me back to teach at his Connecticut Valley School of Woodworking (CVSW). April 5th through the 7th is Gorgeous Gams & Foot Fetishes: Its all about the Legs and the Feet- A 3 day weekend of fun and inspiration with Glen Huey. (Click here, then scroll about 2/3 down the page for additional class information.)

There is a lot to cover over the three days. Did you know you can get very accurate patterns from photos?  During the class we’ll rip leg and feet from actual furniture photos then learn how to develop those into full-size patterns. I’ll also show you how to shape cabriole legs. Where to start and what tools make the task easy and repeatable – we do want our four legs to match, right? After you get a leg shaped, it’s on to tapered legs. You may think you have a handle on tapered legs, but I’ll fill in a few blanks on what legs fit with what periods and I’ll demonstrate a couple techniques that are sure to add to your knowledge and abilities. And of course, we cannot bypass feet. An in-depth study of bracket and ogee-bracket feet is sure to bring discussion. Contact CVSW to register for the class.

SAMSUNGLater in April (April 29 through May 3), I show up at Chuck Bender’s Acanthus Workshops to teach the first week long class. Since Acanthus is in Chester County Pennsylvania, what better project could you build than a small chest that’s big with line & berry inlay. (A chest, by the way, that is featured in the June 2013 issue of Popular Woodworking Magazine, in case you get closed out of the class.) This chest, attributed to Moses Pyle and built for Hannah Darlington, is part of the collection at Winterthur Museum. Not only do you build this chest during the week, but you may get a chance to see the original in a day trip to the museum. If line & berry inlay is your weakness, this is the class to take. Construction is not over the top, so we’re sure to finish the project. (That will make the spouse happy, huh?) During the class we’ll use both power tools and hand tools to inlay the piece. (Acanthus has been plagued by website difficulties over the past few weeks. If the class listing cannot be found, give Chuck a couple days to get things corrected and posted.)

CT LowboyRounding out the year, except for Woodworking in America in October, I return to CVSW to instruct a class building a Connecticut Lowboy. This piece, discovered in a backroom tour of the Connecticut Historical Society, stopped both Bob and I in our tracks. I immediately said that this would be a great class. Great minds think alike. Bob added the class to his summer schedule. The class runs from September 3rd through the 8th.

If you are a study of period furniture designs, you see that this lowboy is a transitional piece – originating as we moved from the William & Mary style into Queen Anne period. I especially like the high arched aprons and the molded profile around the drawers. Also, there is a very interesting building technique used on the inside of this piece.

(Might I suggest a “twofor” at CVSW. Sign up for the legs class then return to build a great lowboy. Contact the school for more information.)

If you would like additional information on these classes, please contact me or the schools directly.

Build Something Great!
Glen

2 Comments

Filed under Antique Pieces, Design

Videos: From Woodworking in America 2012

From October 12 – 14, 2012 I taught three different sessions at Woodworking in America – West Coast in Pasadena, California. Two of the same sessions were taught at Woodworking in America – Midwest some three weeks later from November 2 – 4. During my sessions, I played short video clips that emphasized various points I thought important. After the conferences, I received many emails asking that I post these video clips on my blog.

If you attended one of my sessions during the conference, these videos make perfect sense. If, however, you did not attend my sessions, or even one of the conferences (Shame on you!), some of these short clips might not be all that they could be. But I think you could still garner a nugget of useful information. If you have comments or questions about the techniques covered in these clips, as always, add a comment at the bottom of the page. I will respond ASAP.

Build Something Great!

Glen

Doors: Types, Tips & Techniques

The Mighty Dovetail

Finishes That Pop

2 Comments

Filed under Finish Techniques, Jigs, Joinery, Power Tools, Routers, Shop Tool, Video

Shortcut To Experience

I don’t think there is any better teacher than experience. The only problem with experience is that it takes time. Lot’s of time. There are, however, ways to bypass that huge time drag and gain from experience quickly. You’re not necessarily getting experience, but you are learning from experience which is the next best option. How do you gain or learn from experience? You learn from those who have already paid their dues.

This week I’m writing about Popular Woodworking Magazine’s Woodworking in America (WIA) conferences. At the bottom of this post is a short video that sums up my thoughts on the conferences,  just what you stand to gain if you attend and why you should be there. Between here and there, I’ll briefly describe the sessions at WIA in which I share my experience.

In “Finishes That Pop” – the title really says it all – I’ll discuss the steps needed to bring a great finish to your project. There are so many areas of woodworking in which small missteps add up to a major disaster. Finishing is at the top of that list. In more than twenty years of furniture construction, I have experienced more finish faux pas than one could expect. (I will never say I have seen it all because there is always something new around the corner.) As a result, I have picked up a number of finishing tips and tricks. For example, did you know that there are times when you should final sand using #120-grit sandpaper, that wood coloration is best done with a good soaking instead of a controlled wipe or that on certain hardwoods applying a coat of oil is great while on others you are simply wasting your time? And just how many coats of oil/varnish does it take to build the right sheen? That’s just the beginning. In the sessions we’ll discuss much more.

In the “The Mighty Dovetail” we’ll examine what has become the joint of all woodworking joints. Today, unlike centuries back, you are judged on how well you cut and fit this joint. That’s a shame because this joint has uses that do not – read that again, please – do not require you to spend huge amounts of time making exact cuts. In fact, After I walk through how to hand-cut this popular joint, I’ll share where you can take a few shortcuts, show to create this joint using a jigsaw and demonstrate how to speed up your process without jeopardizing a hand-cut look. Then we’ll spend time learning where, in building furniture, dovetails are a great choice and some areas to avoid altogether. If you are a dovetail devotee or newbie, this session will open your eyes.

I have often said that if you know case construction (as in dovetails discussed above) and you can build a drawer and door,  you have all the tools needed to produce any piece of furniture. In “Doors: Types, Tips & Techniques” we’ll discuss all things door, including mortise-and-tenon joinery, mitered sticking and creating raised panels. I’ll share my techniques for producing door panels of all kinds, and the best angle to tilt your table saw to produce a perfect fit into a frame groove. I’ll even talk about hand planes and raised panels, too. In addition, I’ll share the technique and the story on why I learned to construct glass-door frames so they were rabbeted for glass right off the table saw – no more frame assembly then routing the rabbet.

These are just my classes at Woodworking in America. There are so many other presenters that I know you’ll come away from these conferences a better woodworker. (Click here to register for a conference, or both conferences, or to read about other presenters and classes.) And as you’ll see in the video below, that is what this is all about. I hope to see you there.

Build Something Great!

Glen

3 Comments

Filed under Design, Finish Techniques, Joinery, Shop Tips